The Workflow Configurator acts as a flowchart / diagrammatic representation of the approval process within your company for the purposes of Leave / Attendance / Claims. Configure how different applications are segregated, how staff have their applications approved, and who gets notified at the end of the process. The configurator shows the steps as boxes of various kinds, and their order by connecting the boxes.
Follow these steps to configure your workflow!
Leave
Adding Conditions
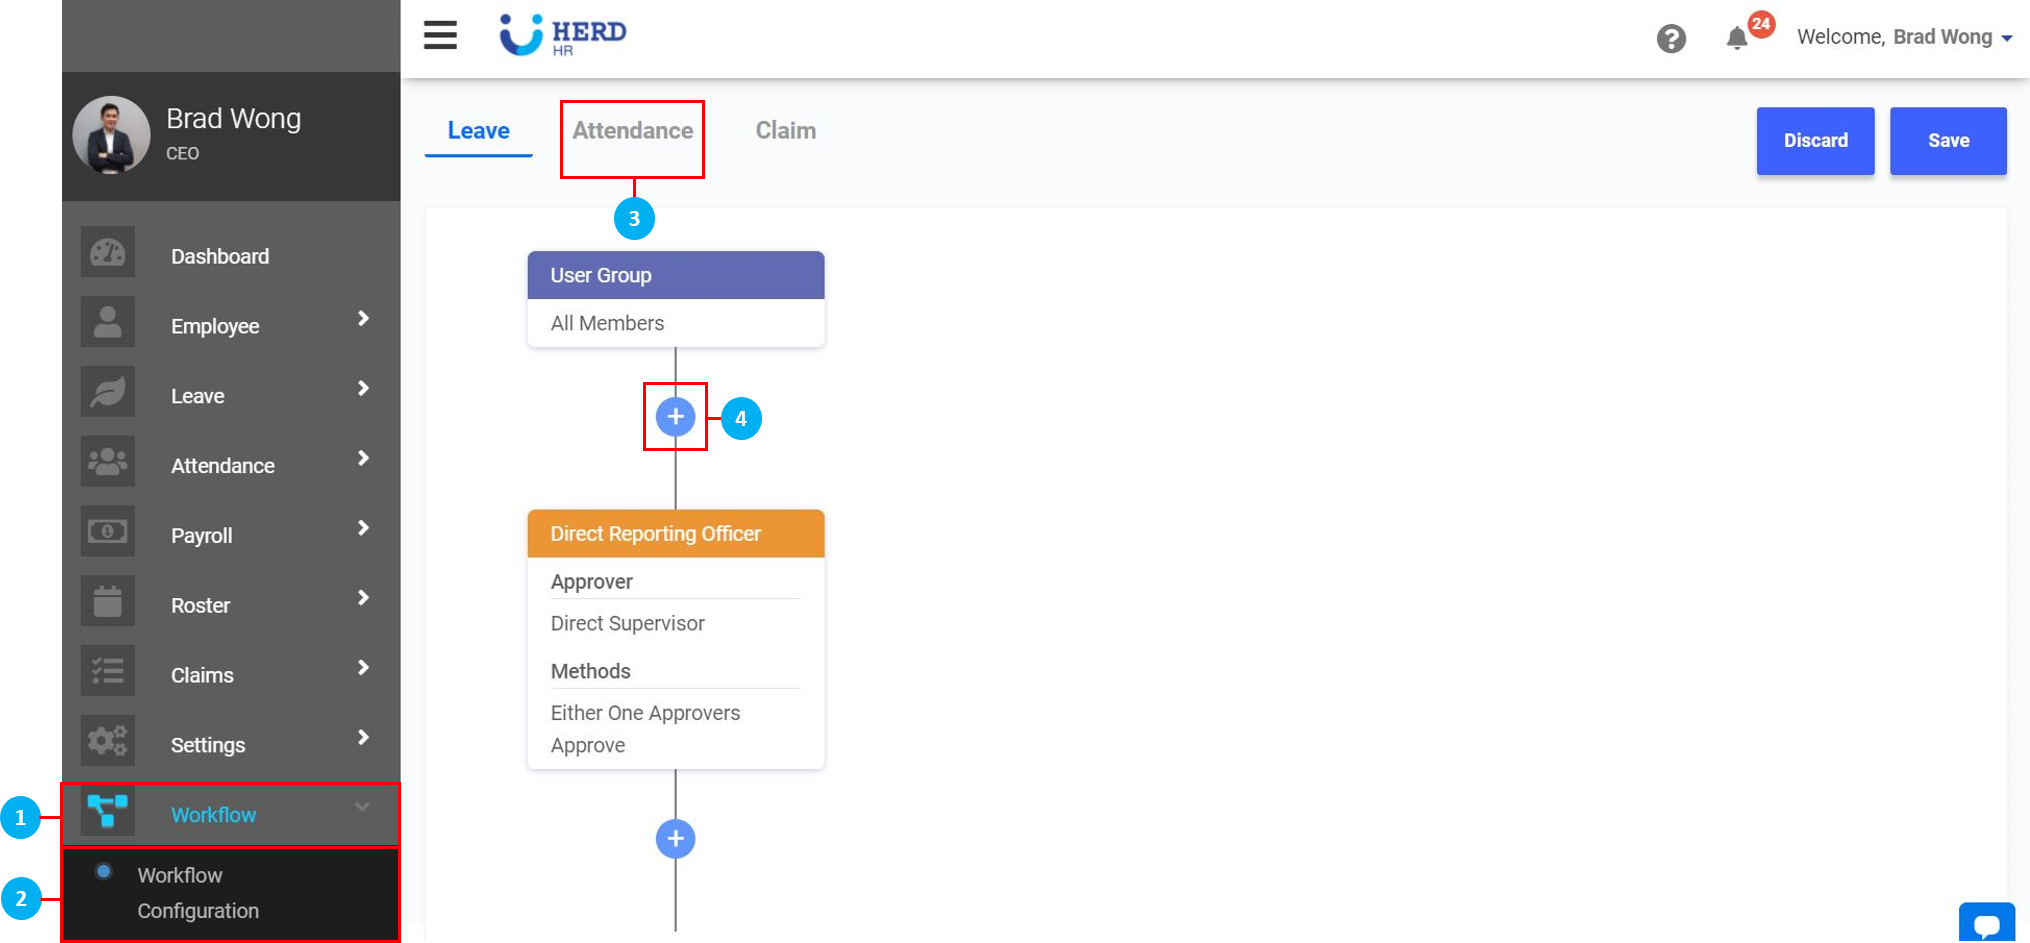
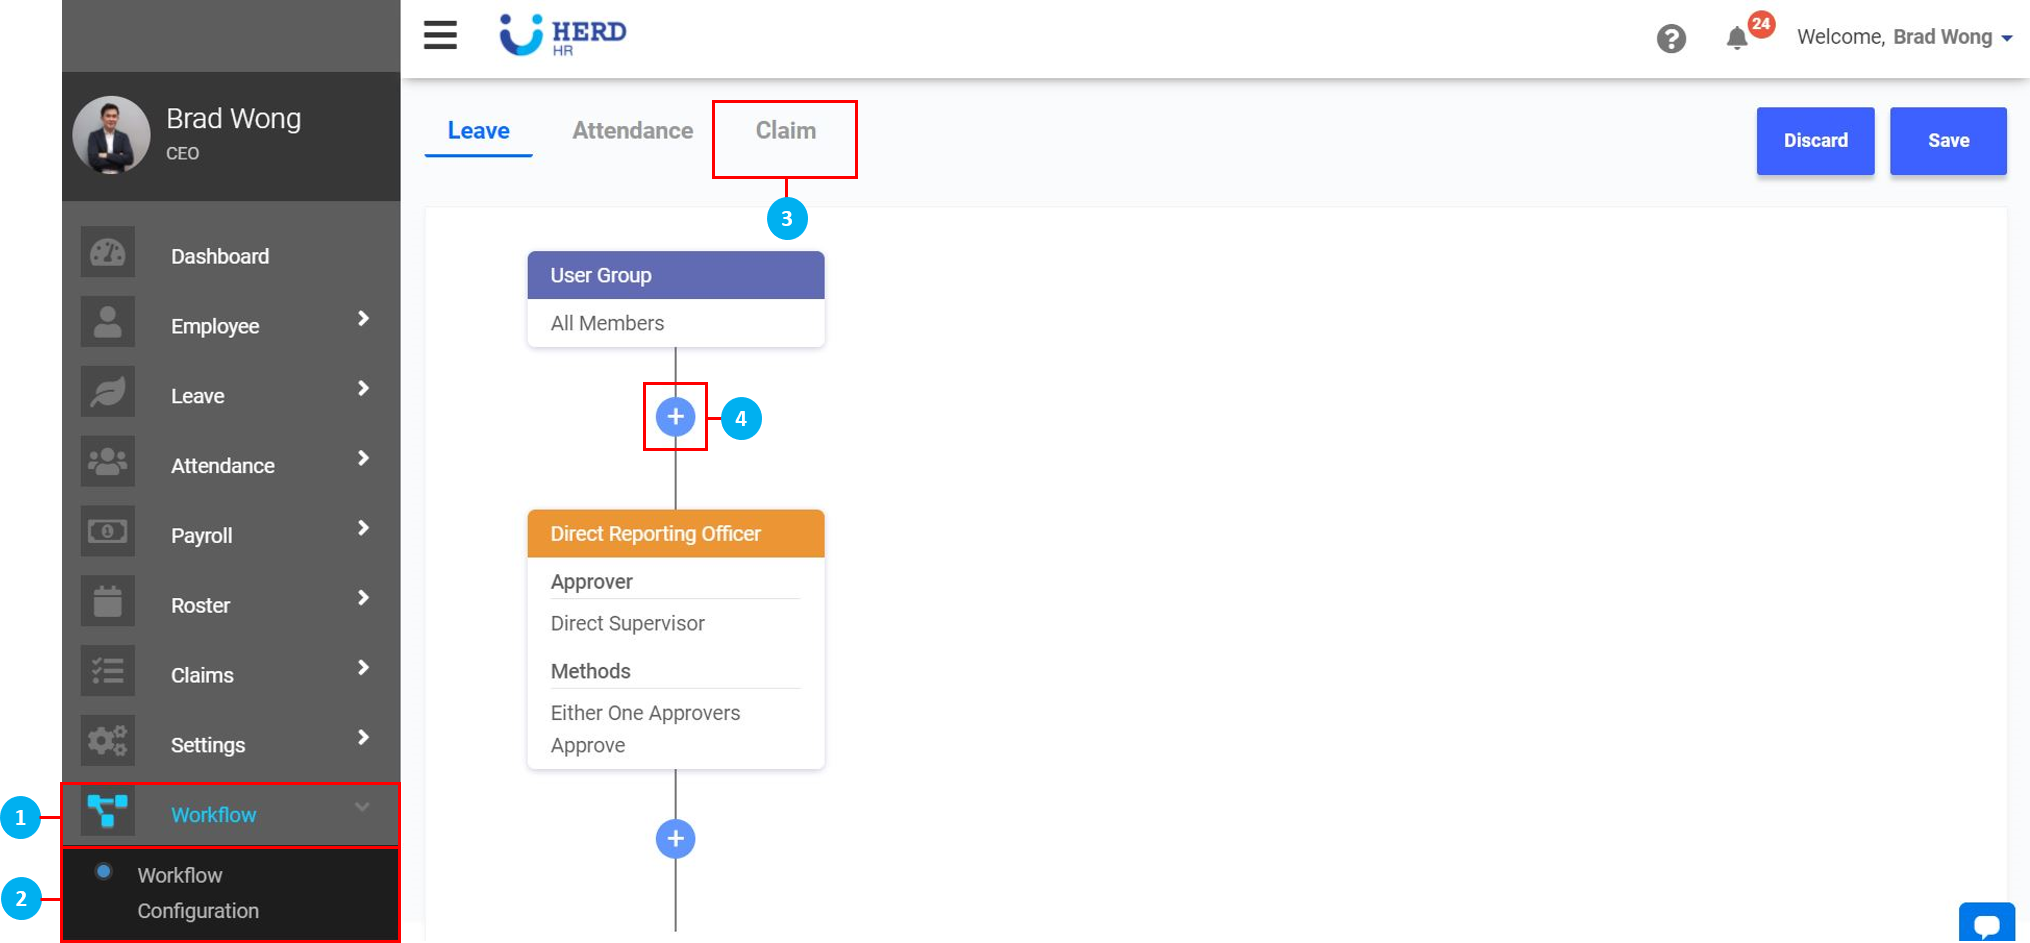
- On the left sidebar menu, click “Workflow”.
- Click "Workflow Configuration".
- To configure the workflow for Leave applications, click "Leave".
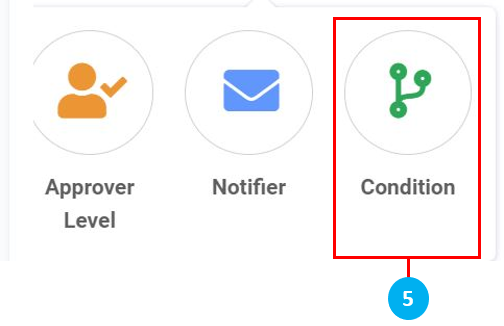
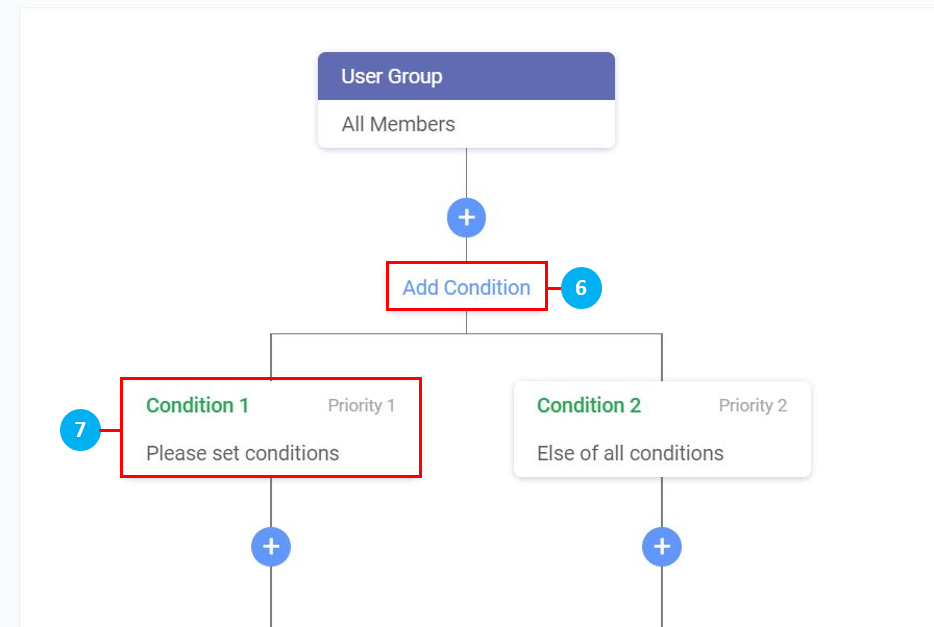
- To begin, click on the
 icon in the generator to insert a condition.
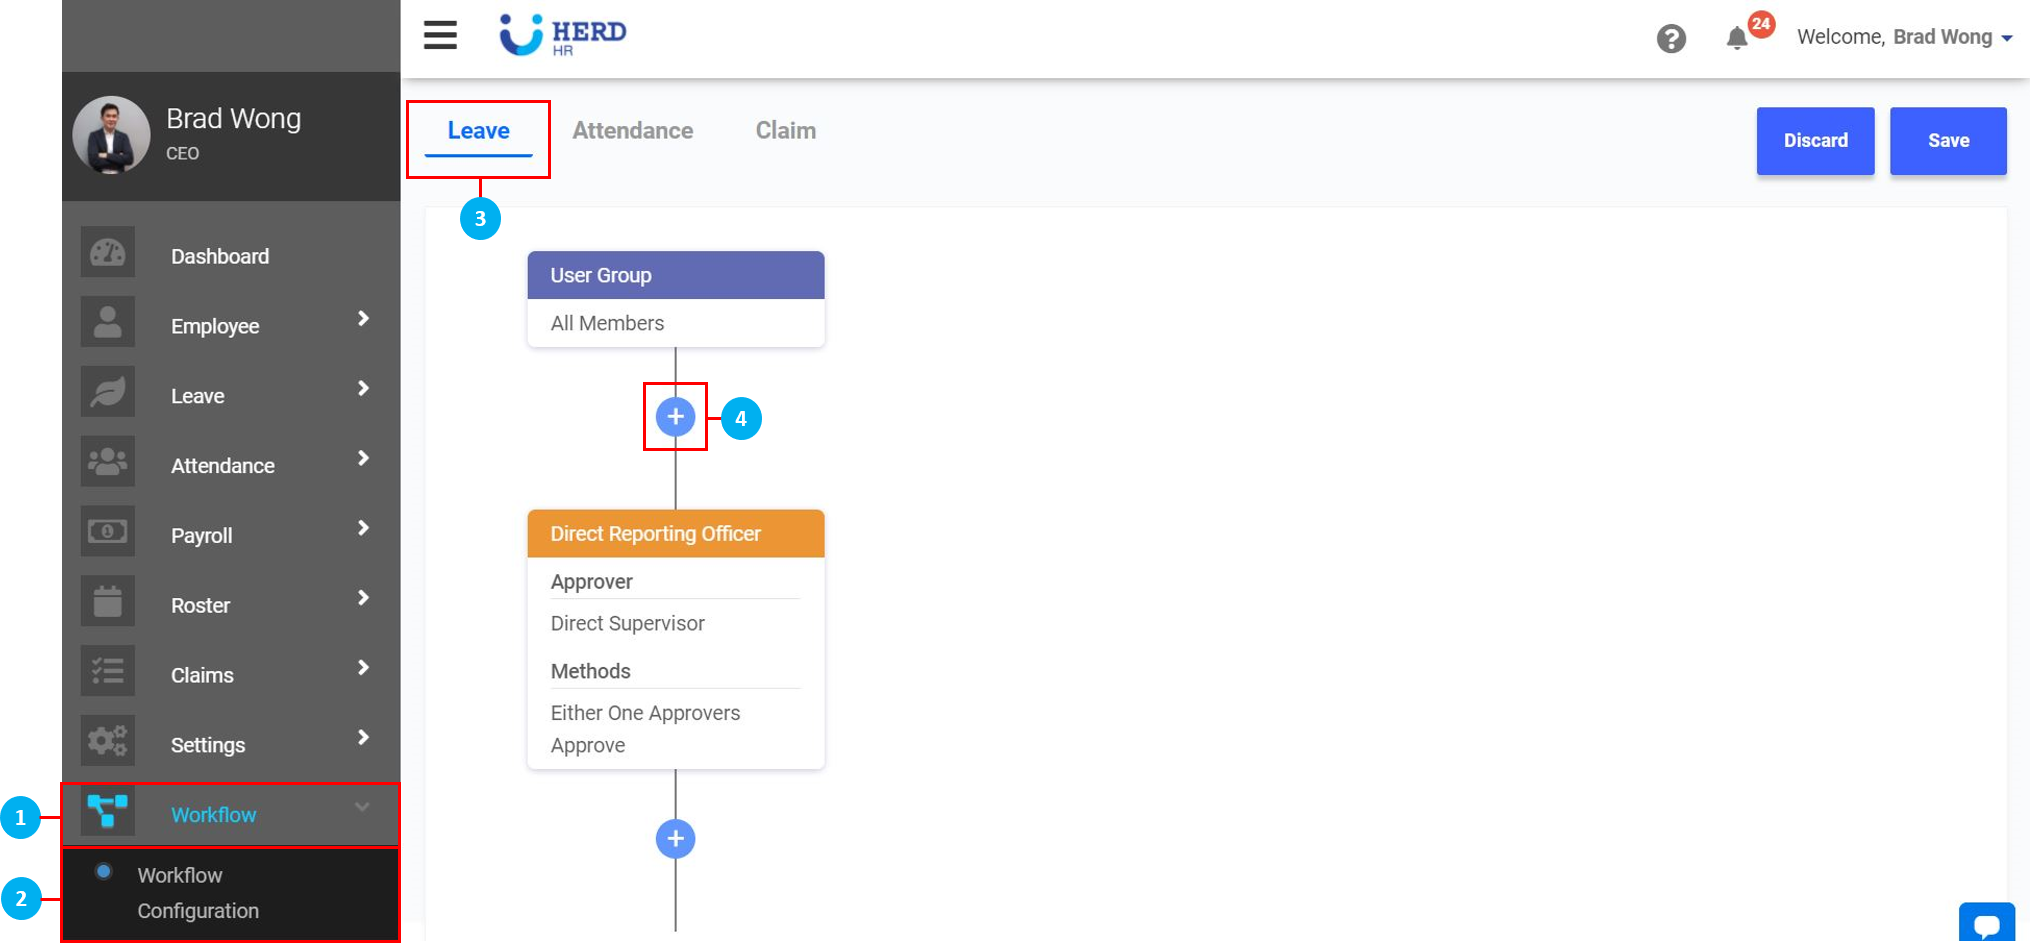
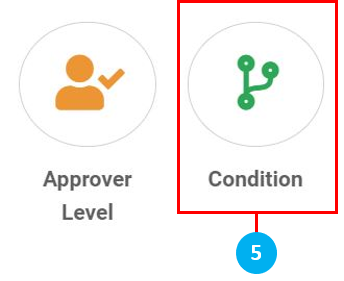
- Click on "Condition". You will be able to select one or multiple conditions from the Condition List.
- Click on "Add Condition" to add a 3rd, 4th, 5th or as many conditions as required. (*Note: The last condition with the lowest priority will always be "Else of all conditions", which means that all the conditions that do not fall into any of the earlier created categories, will end up here.)
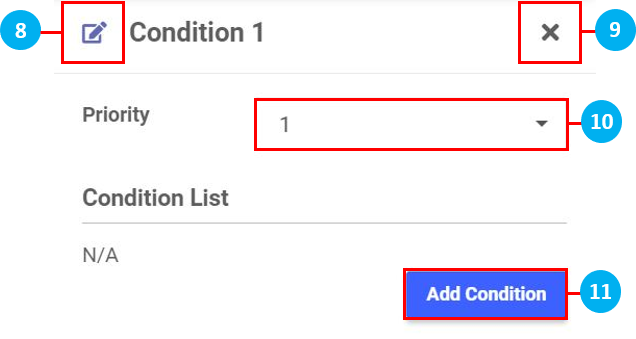
- Click on the "Condition 1" box (with green text).

- Click on the
 icon to edit the name of the header. Click on the
  icons to confirm or cancel.
 - Click on the 'X' to cancel.
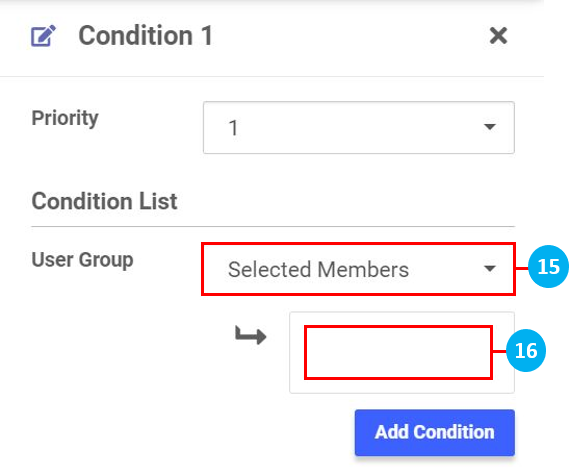
- Select the Priority of this condition from the drop down list, 1 being the highest priority, 2 being the 2nd highest, and so on. This will apply when there are multiple conditions created.
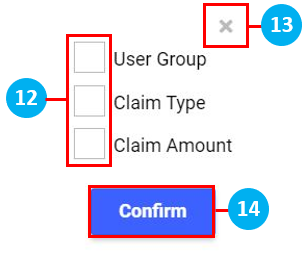
- Click "Add Condition" to select your condition from the list.
- Select one or multiple conditions.
- Click on the 'X' to cancel.
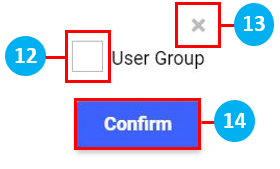
- Click "Confirm" to configure these selections in greater detail.
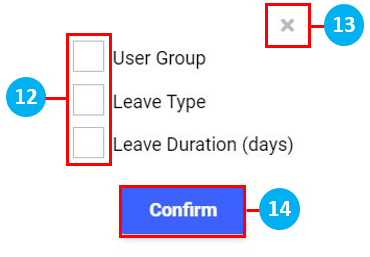
- For "User Group", select one of Selected Members / Roles / Departments / All Members from the drop down list.
- Click in the box to select Select Members / Roles / Departments from the drop down list that appears, as required. No drop down list appears if "All Members" is selected. Click on the "X" to remove entries where required.
- For "Leave Type", select a Leave Type (already created in Settings > Leave Types) from the drop down list that appears. Click on the "X" to remove entries where required.
- For "Leave Period (day)", select one of Less Than or Equal / More Than or Equal / Equal from the drop down list that appears, as required.
- Key in the number of days. Once done, click on anywhere in the Workflow Configurator to continue.

Adding Approver Level
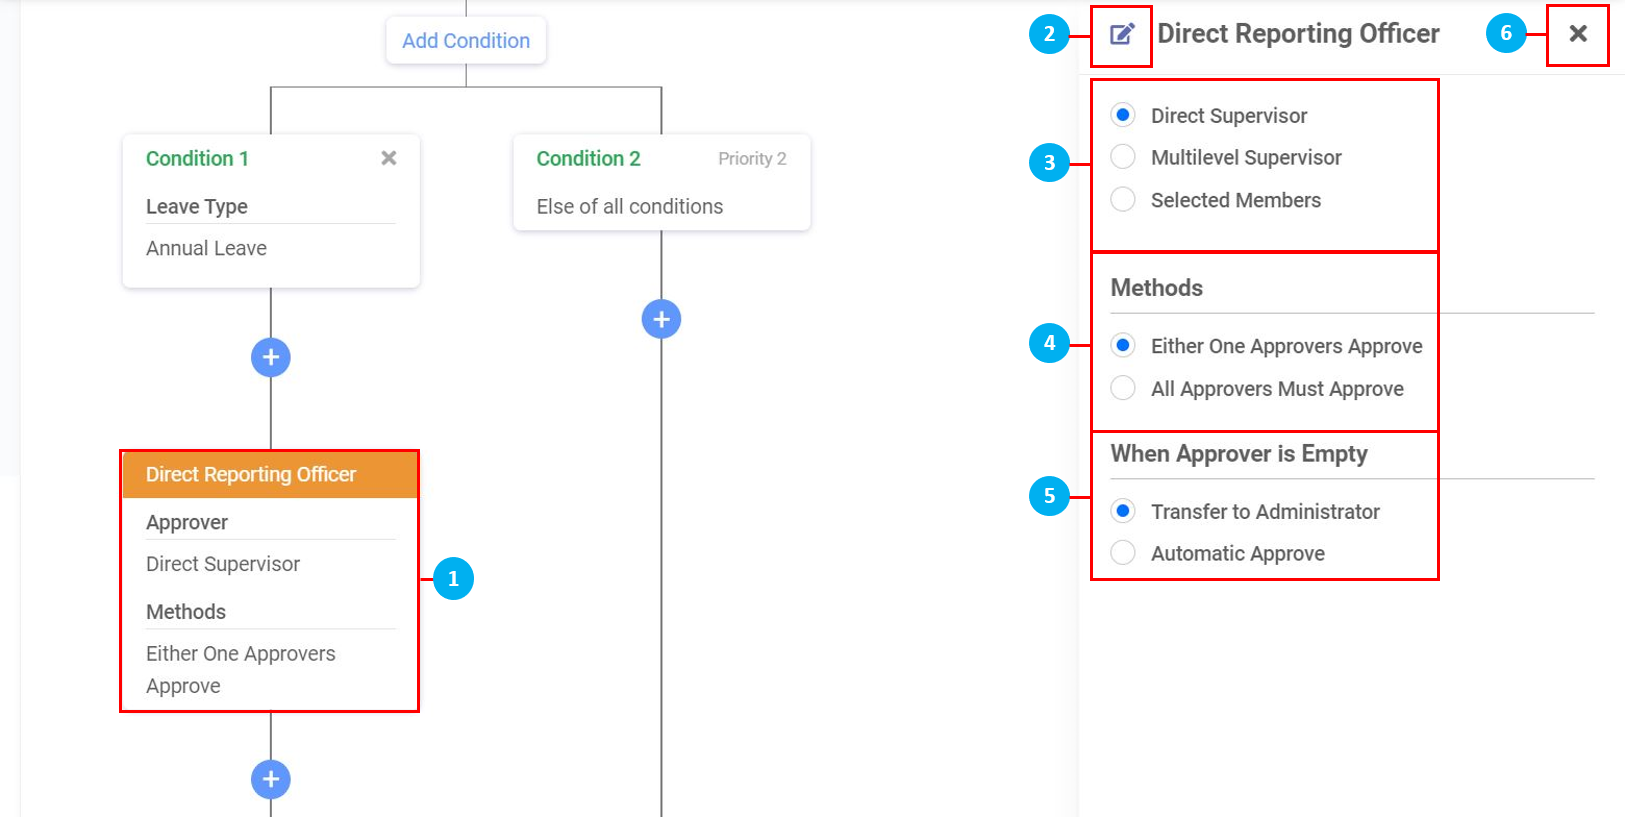
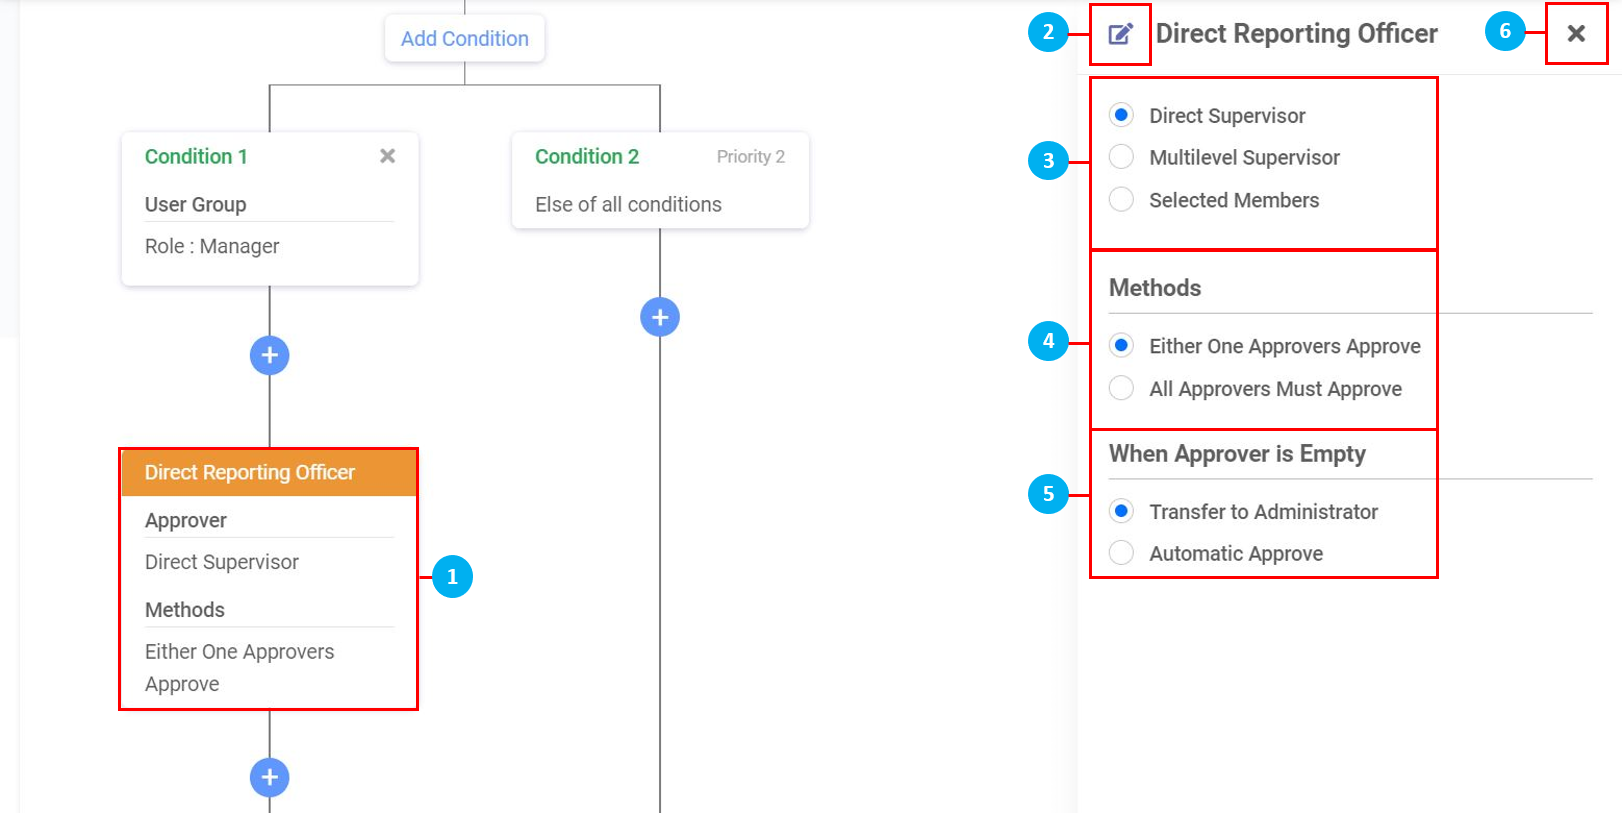
- By default in Leave, there is one "Approver Level" present. Click on the box (with the orange coloured header) to edit the approver settings.
- Click on the icon to edit the name of the header. Click on the icons to confirm or cancel.
- Select the "Approver" as either the Direct Supervisor / Multilevel Supervisor / Selected Members.
- Direct Supervisor - This applies to an Employee's Reporting Officer (as configured in Employee > Profile > Personal tab > Reporting Officer), or as seen as the person one level above the Employee in the Approval Matrix)
- Multilevel Supervisor - Select the number of levels of approvers required. By clicking on an Employee in the Approval Matrix, you are able to see how many levels of approvers there are above them.
- Selected Members - Select members from the drop down list. Click on the "X" to remove entries where required.
- Select the "Method" of approval.
- Select what happens "When Approver is Empty" and there is no Reporting Officer or approver assigned to an Employee.
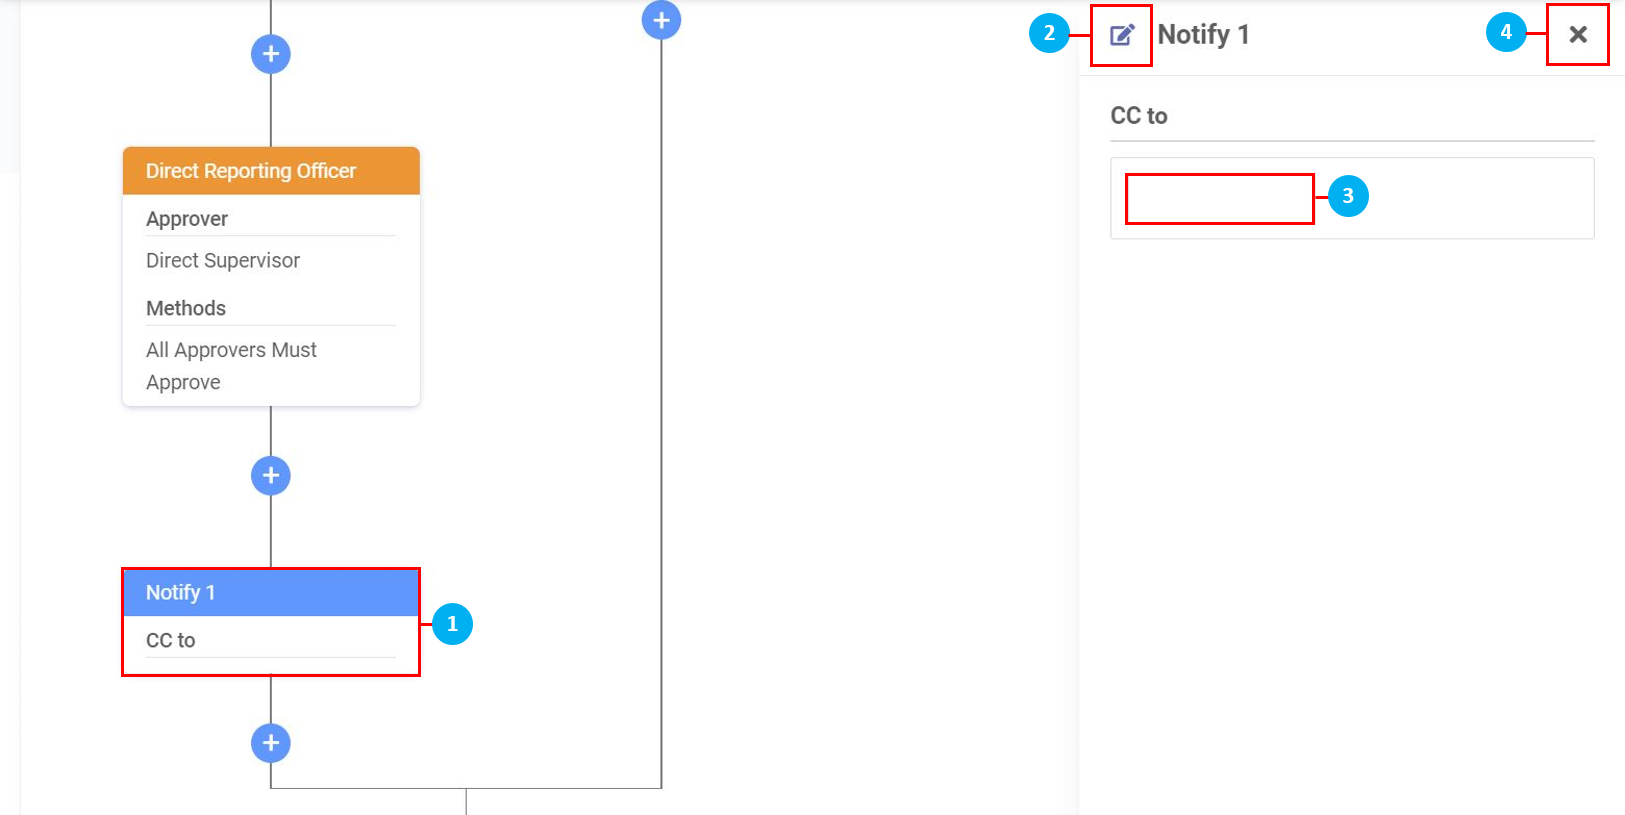
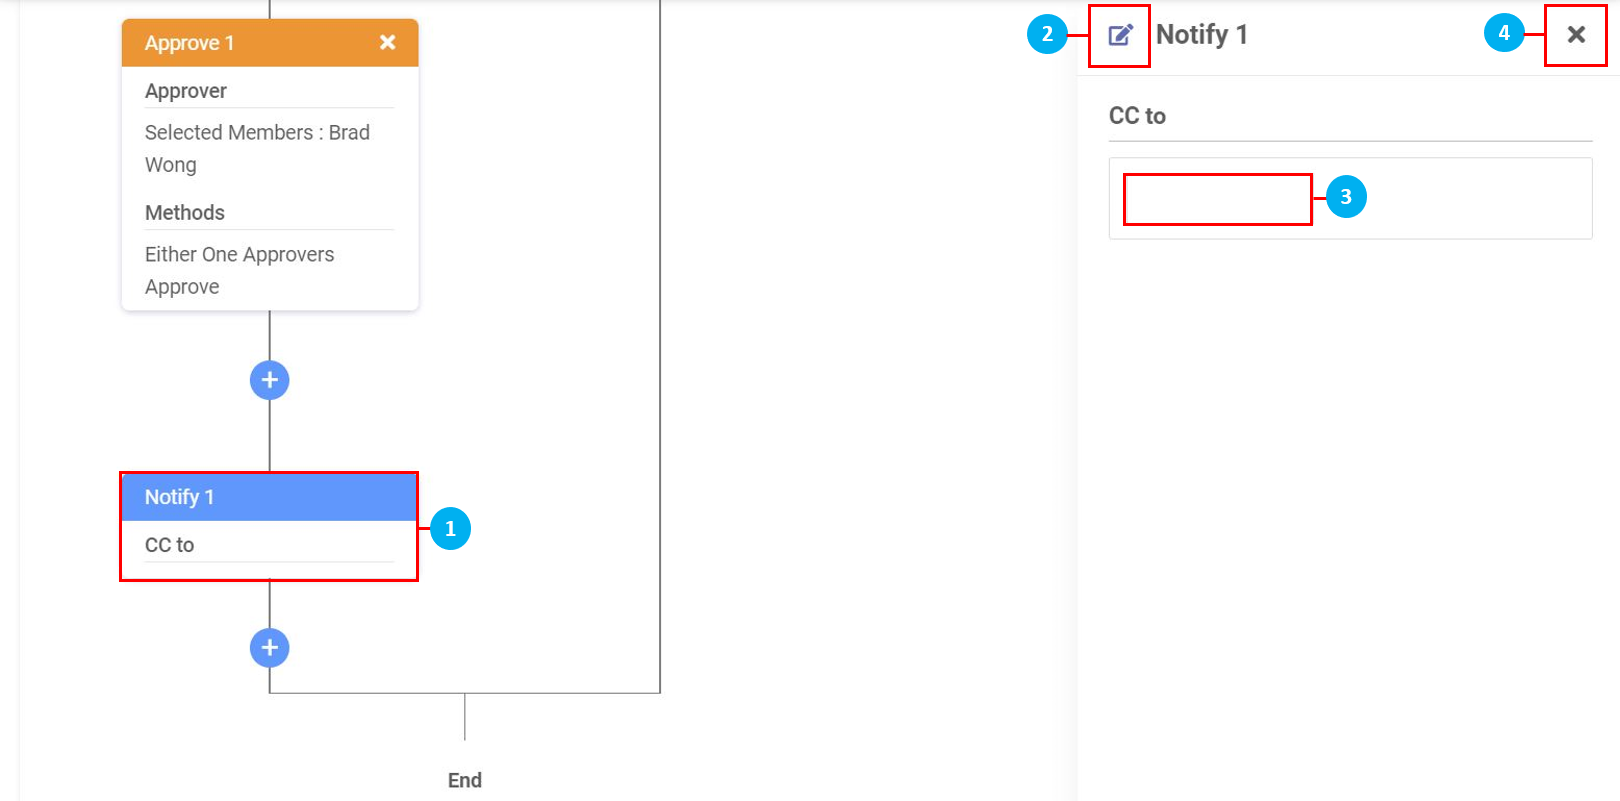
Adding Notifier
- Click on the box (with the blue coloured header) to configure who receives an email notification of a Leave application approval.
- Click on the icon to edit the name of the header. Click on the icons to confirm or cancel.
- Click in the box to select names from the drop down list. Click on the "X" to remove entries where required.
- Click on the 'X' to cancel.
Sample Leave Workflow Configuration
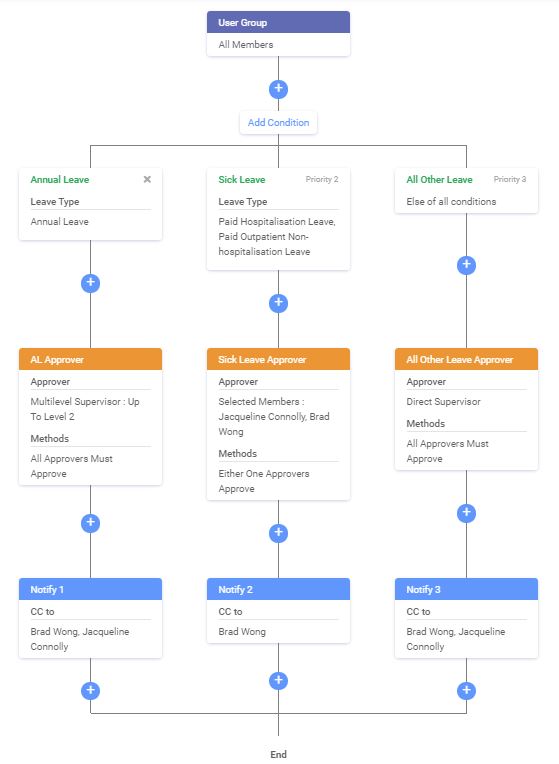
In this example, we take a look at how a company approves different types of Leave.
- This company splits Leave into 3 categories - Annual Leave / Sick Leave / All Other Leave.
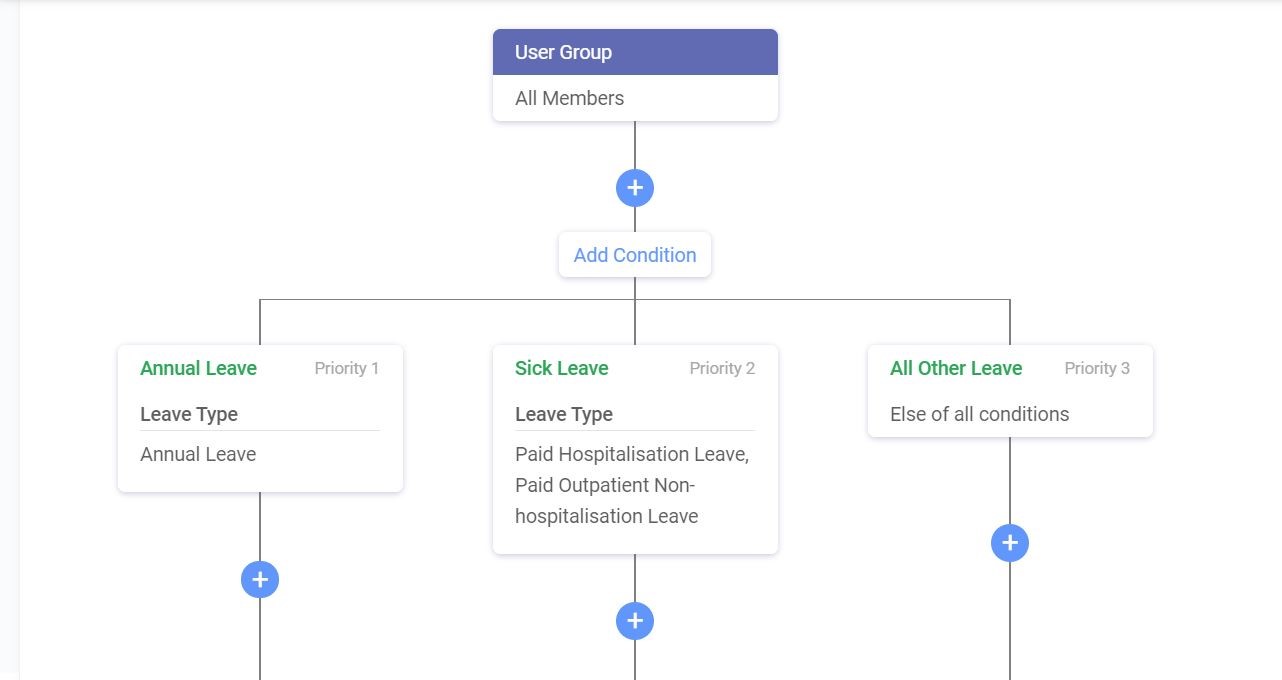
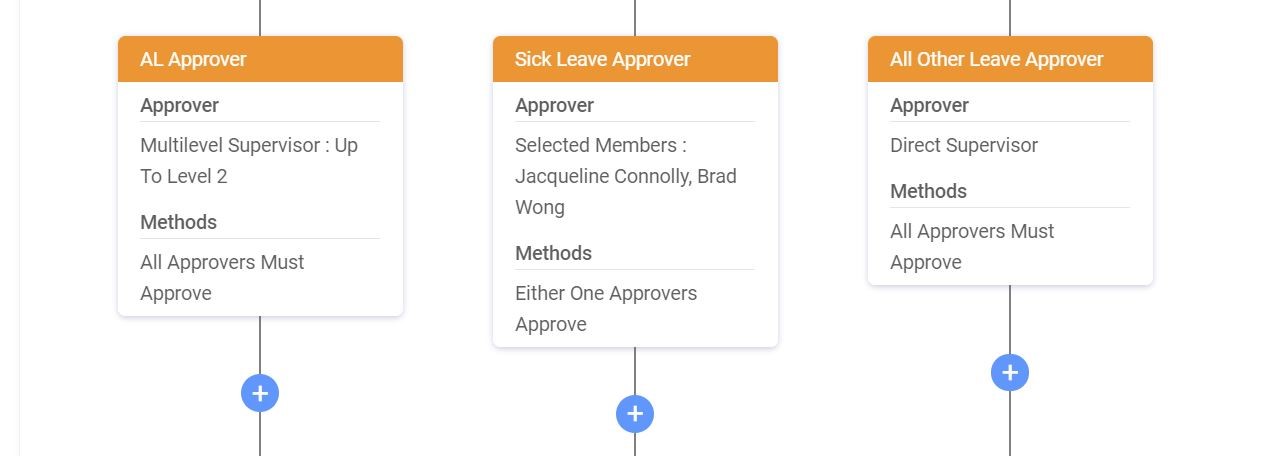
- At the next level of the workflow chart, we can see the Approvers and Methods.
- AL Approver (for Annual Leave) - 2 levels of Supervisors above the applicant has to approve the Leave application. Both the Supervisors have to approve the application.
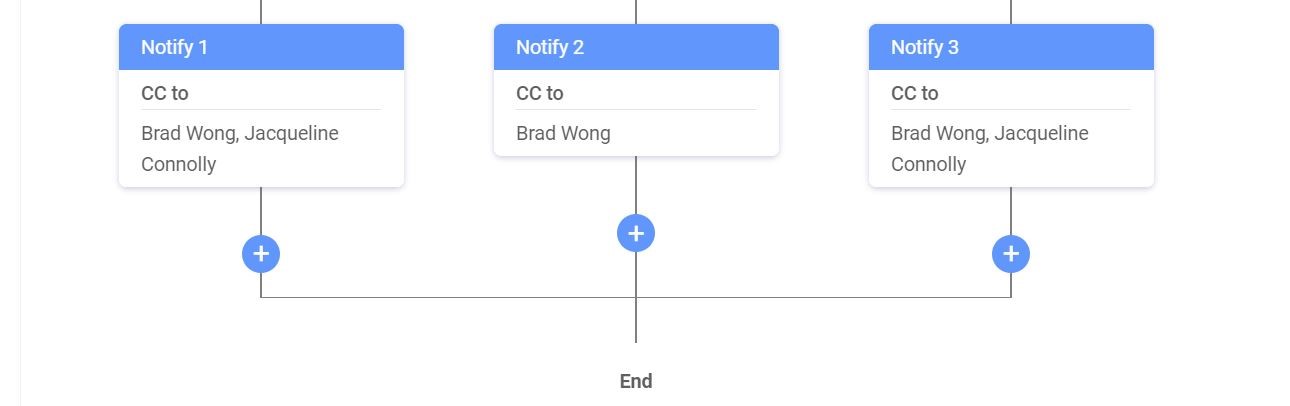
- Sick Leave Approver (for Sick Leave) - Either Brad Wong (CEO) or Jacqueline Connolly (HR Manager) have to approve the Leave application.
- All Other Leave Approver (for all other Leave that does not fall into the Annual Leave and Sick Leave categories) - Only the direct supervisor has to approve the Leave Application.
- The final level of this workflow chart shows who gets informed via email of the various Leave applications.
- Overview of Workflow chart:
- Once done, click SAVE on the top right of the page.
- Click DISCARD to remove all the changes made since the last save.
Attendance
Creating a Workflow chart for Attendance follows the same steps as the configuration for Leave. The only difference is there is no option to add Notifiers.
(*Note: If there are timesheets pending acknowledgement, you will be prompted to clear them before using the Workflow Configurator. Once the workflow has changed, only the system admin will be able to acknowledge those pending timesheets.)
Adding Conditions
- On the left sidebar menu, click “Workflow”.
- Click "Workflow Configuration".
- To configure the workflow for Attendance acknowledgements, click "Attendance".
- To begin, click on the icon in the generator to insert a condition.
- Click on "Condition". You will be able to select one or multiple conditions from the Condition List.
- Click on "Add Condition" to add a 3rd, 4th, 5th or as many conditions as required. (*Note: The last condition with the lowest priority will always be "Else of all conditions", which means that all the conditions that do not fall into any of the earlier created categories, will end up here.)
- Click on the "Condition 1" box (with green text).
- Click on the icon to edit the name of the header. Click on the icons to confirm or cancel.
- Click on the 'X' to cancel.
- Select the Priority of this condition from the drop down list, 1 being the highest priority, 2 being the 2nd highest, and so on. This will apply when there are multiple conditions created.
- Click "Add Condition" to select your condition from the list.

- Select condition "User Group".
- Click on the 'X' to cancel.
- Click "Confirm" to configure to select which User Group to assign to this condition.
- Select one of Selected Members / Roles / Departments / All Members from the drop down list.
- Click in the box to select Select Members / Roles / Departments from the drop down list that appears, as required. No drop down list appears if "All Members" is selected.
Adding Approver Level
- By default in Attendance, there is one "Approver Level" present. Click on the box (with the orange coloured header) to edit the approver settings.
- Click on the icon to edit the name of the header. Click on the icons to confirm or cancel.
- Select the "Approver" as either the Direct Supervisor / Multilevel Supervisor / Selected Members.
- Direct Supervisor - This applies to an Employee's Reporting Officer (as configured in Employee > Profile > Personal tab > Reporting Officer), or as seen as the person one level above the Employee in the Approval Matrix)
- Multilevel Supervisor - Select the number of levels of approvers required. By clicking on an Employee in the Approval Matrix, you are able to see how many levels of approvers there are above them.
- Selected Members - Select members from the drop down list. Click on the "X" to remove entries where required.
- Select the "Method" of approval.
- Select what happens "When Approver is Empty" and there is no Reporting Officer or approver assigned to an Employee.
Sample Attendance Workflow Configuration
In this example, we take a look at how a company acknowledges the Attendance of their Employees.
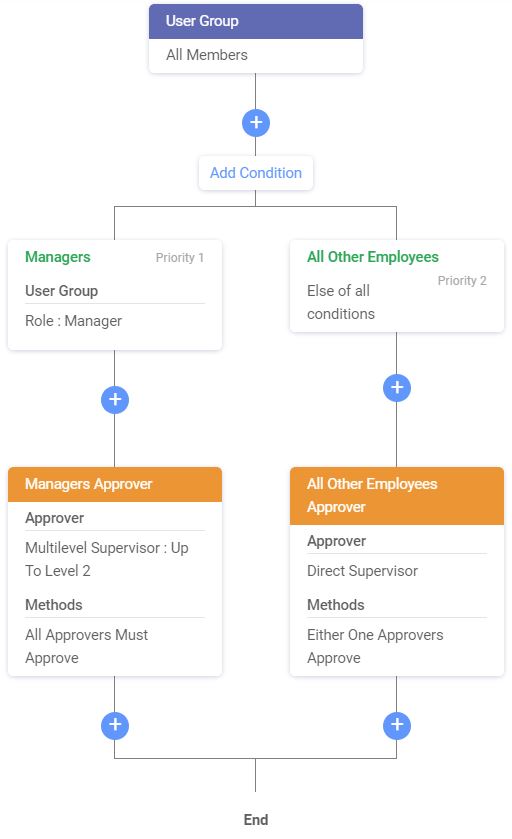
- This company splits Attendance acknowledgement into 2 groups by Role - Managers / All Other Employees.
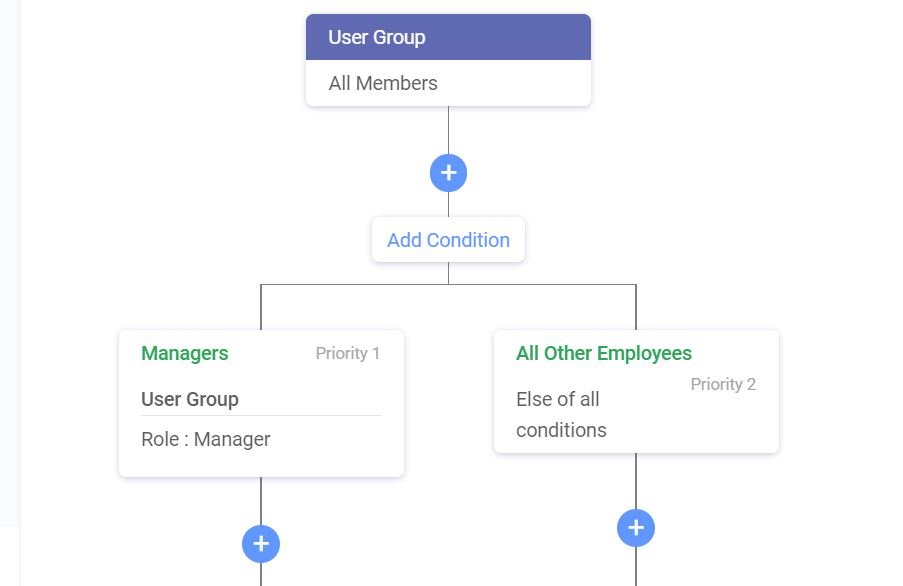
- At the next level of the workflow chart, we can see the Approvers and Methods.
- For Role: Managers in the first column, they will have 2 levels of supervisors acknowledging their Attendance. In the the case of this company based on their Approval Matrix chart, that will be their direct individual supervisors (CFO / COO / CTO), and the next level above that which will be the CEO. Both levels have to acknowledge their Attendance.
- For Else of all conditions, anyone who does not fall into the group in the first column (Priority 1), will have their Attendance acknowledged by their Direct Supervisor only.
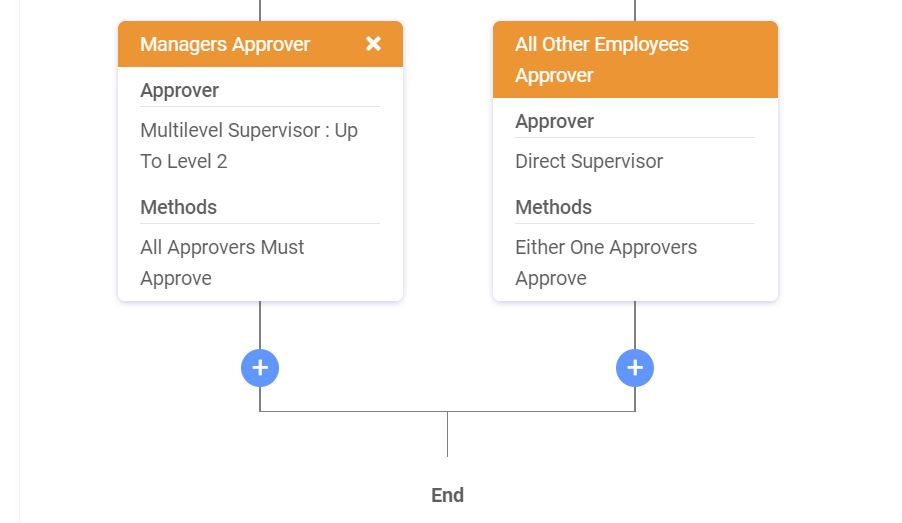
- Overview of Workflow chart:
- Once done, click SAVE on the top right of the page.
- Click DISCARD to remove all the changes made since the last save.
Claim
Creating a Workflow chart for Claims follows the same steps as the configuration for Leave and Attendance. (*Note: If Claims settings have already been set in the Claims module, these settings will be reflected here as a Workflow chart. If not, the below will be the default starting view.)
Adding Conditions
- On the left sidebar menu, click “Workflow”.
- Click "Workflow Configuration".
- To configure the workflow for Leave applications, click "Claim".
- To begin, click on the icon in the generator to insert a condition.
- Click on "Condition". You will be able to select one or multiple conditions from the Condition List.
- Click on "Add Condition" to add a 3rd, 4th, 5th or as many conditions as required. (*Note: The last condition with the lowest priority will always be "Else of all conditions", which means that all the conditions that do not fall into any of the earlier created categories, will end up here.)
- Click on the "Condition 1" box (with green text).
- Click on the icon to edit the name of the header. Click on the icons to confirm or cancel.
- Click on the 'X' to cancel.
- Select the Priority of this condition from the drop down list, 1 being the highest priority, 2 being the 2nd highest, and so on. This will apply when there are multiple conditions created.
- Click "Add Condition" to select your condition from the list.
- Select one or multiple conditions.
- Click on the 'X' to cancel.
- Click "Confirm" to configure these selections in greater detail.
- For "User Group", select one of Selected Members / Roles / Departments / All Members from the drop down list.
- Click in the box to select Select Members / Roles / Departments from the drop down list that appears, as required. No drop down list appears if "All Members" is selected. Click on the "X" to remove entries where required.
- For "Claim Category", select a Claim Type (already created in Claims > Claims Settings > Claims Type) or Claim Policy (already created in Claims > Claims Settings > Claims Group).
- Click in the box to select Claim Type or Claim Policy from the drop down list. Click on the "X" to remove entries where required.
- For "Claim Amount", select one of Less Than or Equal / More Than or Equal / Equal from the drop down list that appears, as required.
- Key in the amount. Once done, click anywhere in the Workflow Configurator to continue.

Adding Approval Level
- By default in Claim, the "Approver Level" is set as the owner account holder / system admin. Click on the box (with the orange coloured header) to edit the approver settings.
- Click on the icon to edit the name of the header. Click on the icons to confirm or cancel.
- Select the "Approver" as either the Direct Supervisor / Multilevel Supervisor / Selected Members.
- Direct Supervisor - This applies to an Employee's Reporting Officer (as configured in Employee > Profile > Personal tab > Reporting Officer), or as seen as the person one level above the Employee in the Approval Matrix)
- Multilevel Supervisor - Select the number of levels of approvers required. By clicking on an Employee in the Approval Matrix, you are able to see how many levels of approvers there are above them.
- Selected Members - Select members from the drop down list. Click on the "X" to remove entries where required.
- Select the "Method" of approval.
- Select what happens "When Approver is Empty" and there is no Reporting Officer or approver assigned to an Employee.

Adding Notifier
- Click on the box (with the blue coloured header) to configure who receives an email notification of a Leave application approval.
- Click on the icon to edit the name of the header. Click on the icons to confirm or cancel.
- Click in the box to select names from the drop down list. Click on the "X" to remove entries where required.
- Click on the 'X' to cancel.
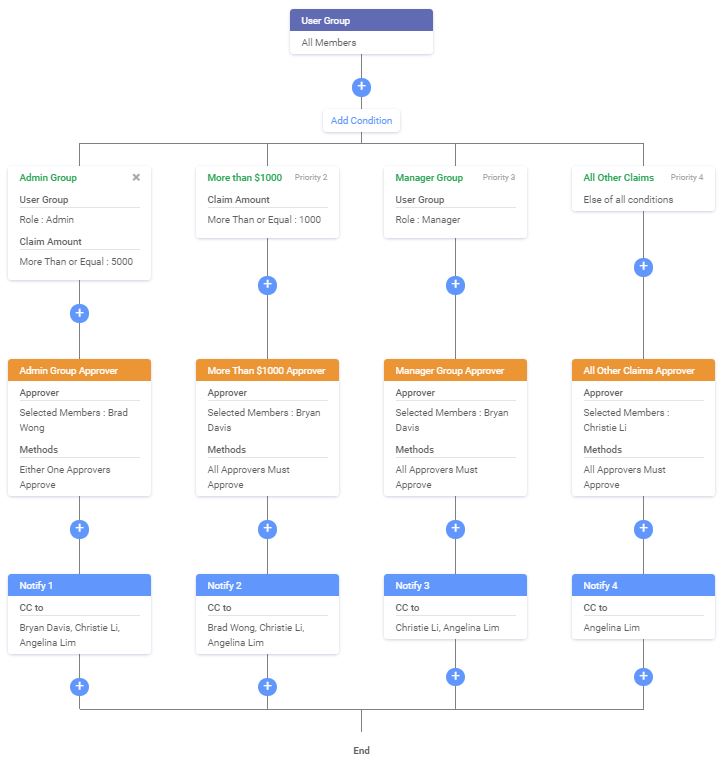
Sample Claim Workflow Configuration
In this example, we take a look at how a company approves different types of Leave.
- This company splits Claim into 4 categories - Admin Group / Claims Over $1000 / Manager Group / All Other Claims.
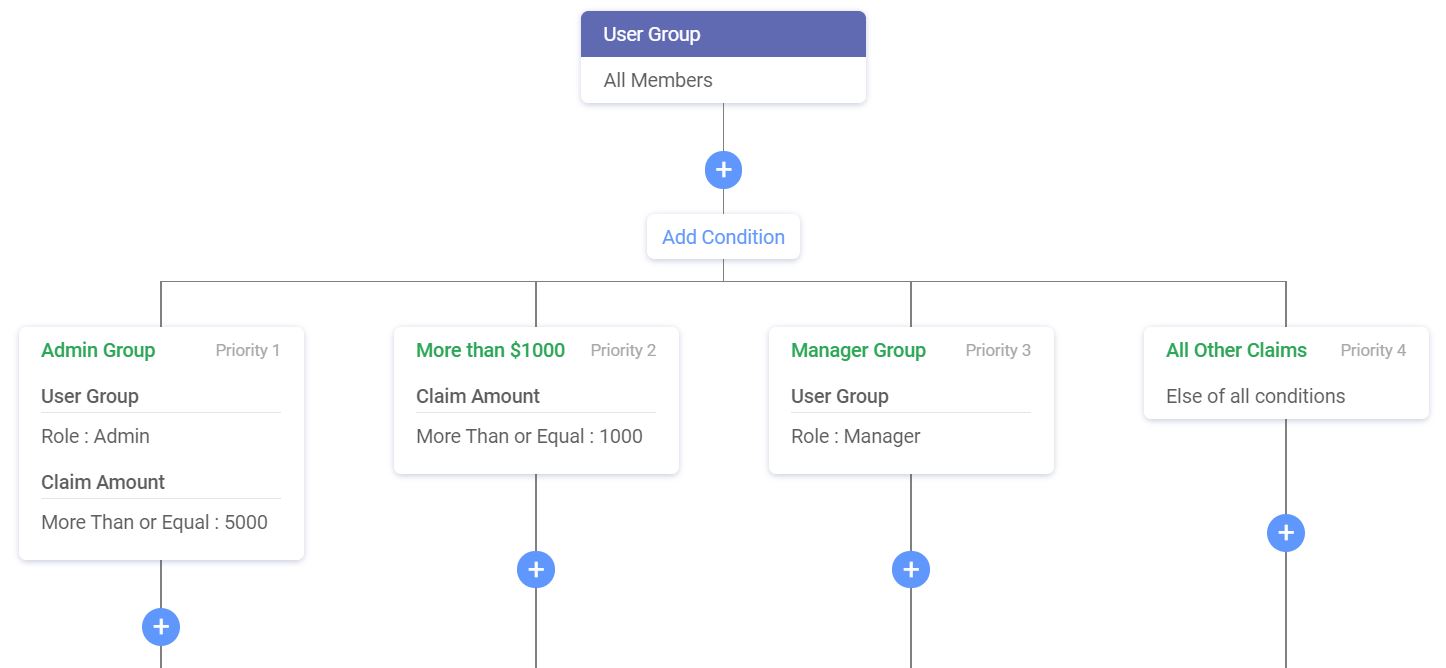
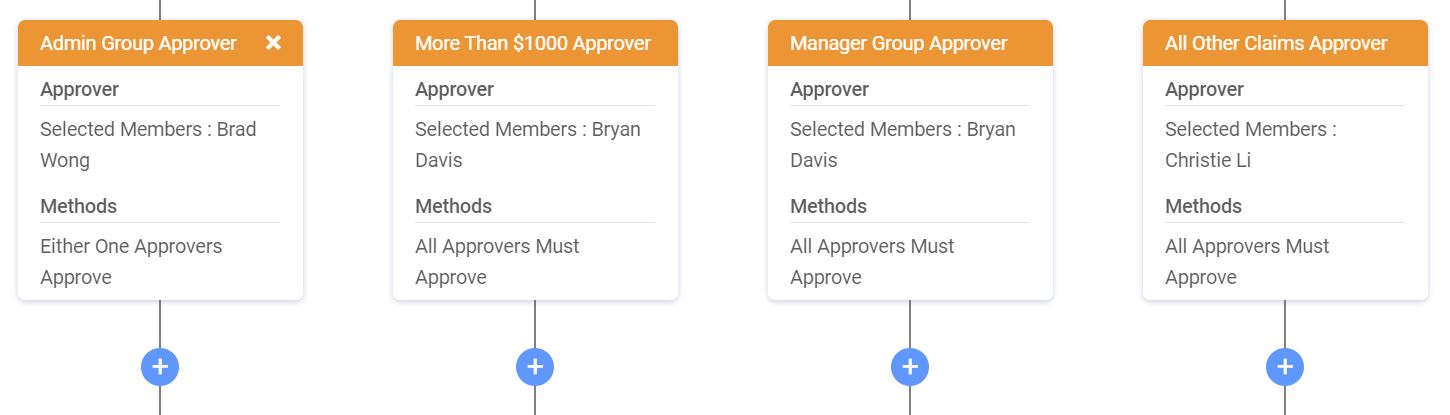
- At the next level of the workflow chart, we can see the Approvers and Methods.
- For the Admin Group which consists of the CFO, COO, CTO, their Claim will be approved by the CEO.
- For any claim of More Than (or equal to) $1000, their Claim will be approved by the CFO.
- For the Manager Group, their Claim will also be approved by the CFO.
- For All Other Claims that do not fall into any one of the earlier three categories, the Claim will be approved by the Finance Manager.
- The final level of this workflow chart shows who gets informed via email of the various Leave applications.

- Overview of Workflow chart:
- Once done, click SAVE on the top right of the page.
- Click DISCARD to remove all the changes made since the last save.