To configure Attendance Settings:
General
- On the left sidebar menu, click “Attendance”
- Click "Attendance Settings"
- Click "General"
- Select how you want Rest Day to be defined
- Key in the distance (in meters) for the GPS valid clocked radius when taking Attendance

- Select the Shift Start Allowance Period
- Select Shift Matching Time Window Before Planned Shift Start Time (In Hours)
- Select Shift Matching Time Window After Planned Shift End Time (In Hours) *Note: Shift Matching Time recognizes that an Employee has started / ended their shift if they clock in / out within the selected number of hours of their actual shift start / end time

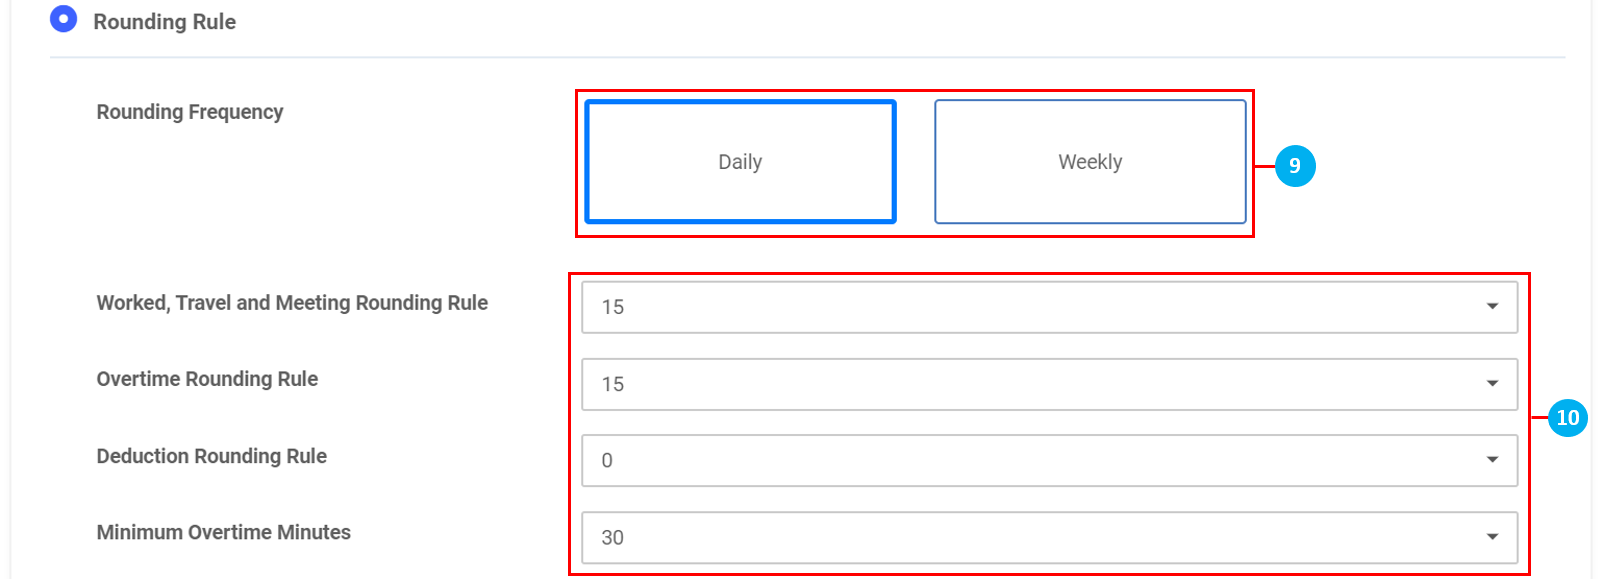
- Select whether the Rounding Rule Frequency is "Daily" or "Weekly"
- Select the Rounding Rule time (in minutes) for Worked, Travel and Meeting / Overtime / Deduction / Minimum Overtime
- At the bottom of the page, click "Save" when done
OT & Deduction
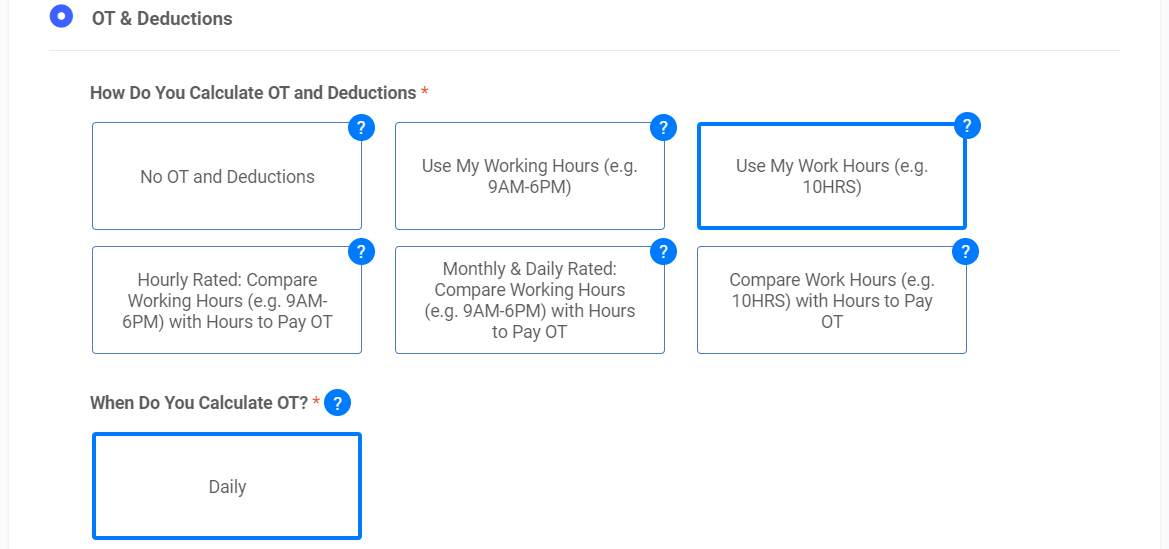
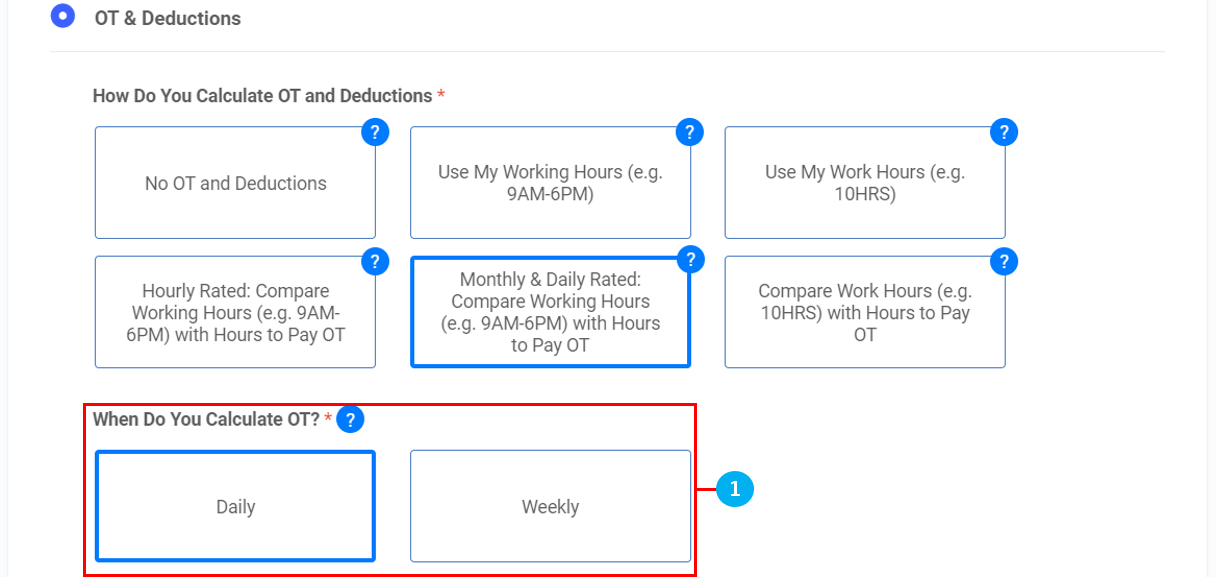
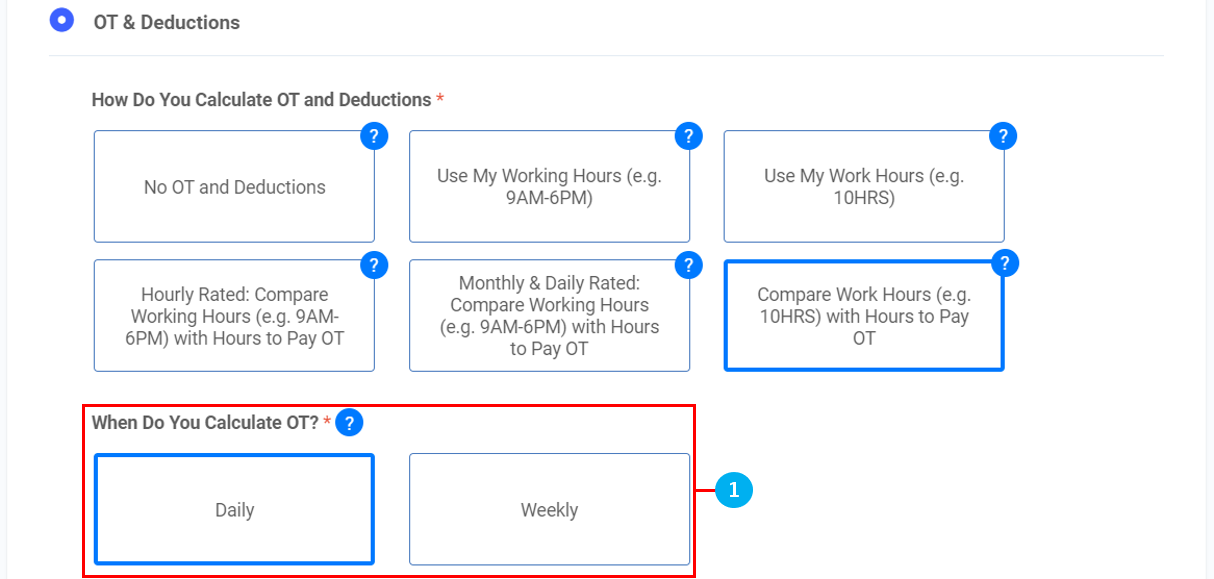
Click "OT & Deduction". Choose how OT & Deductions are calculated (6 options)
-
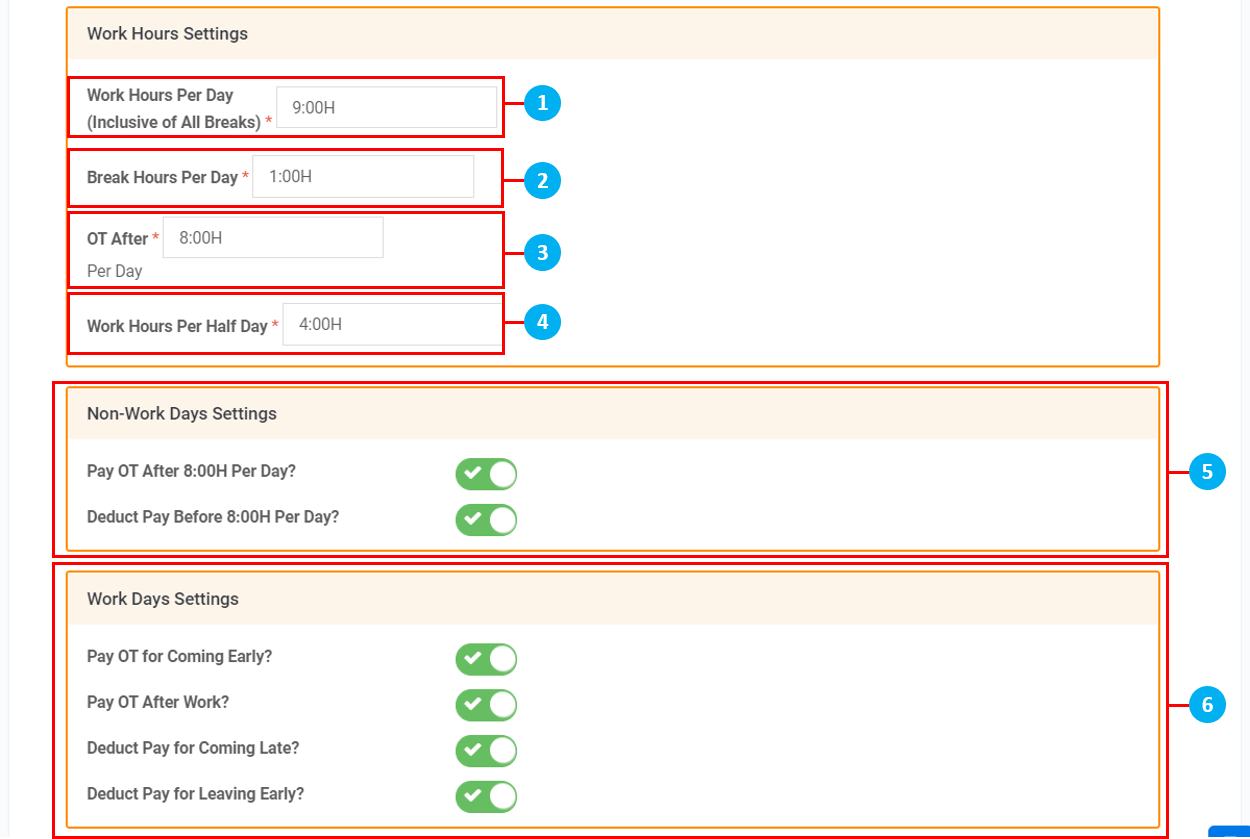
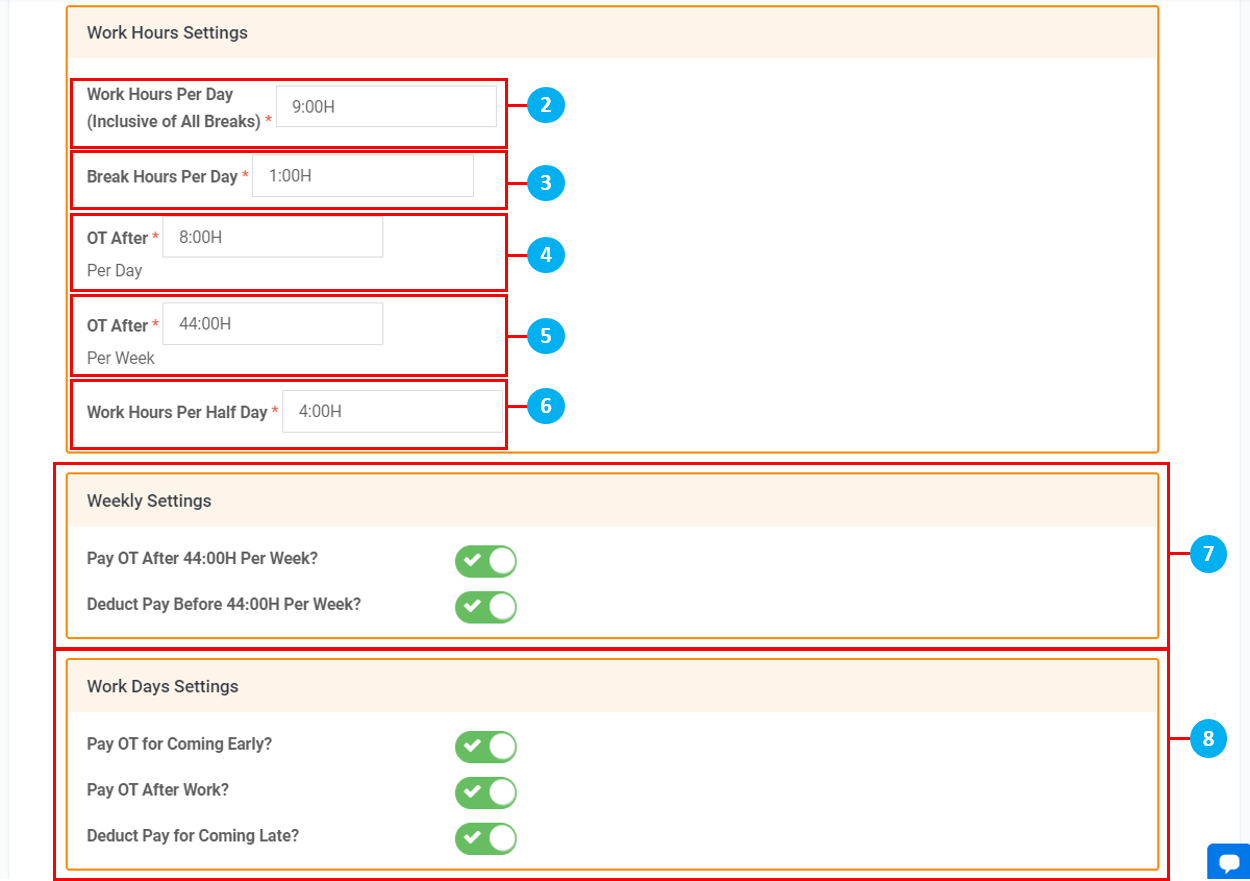
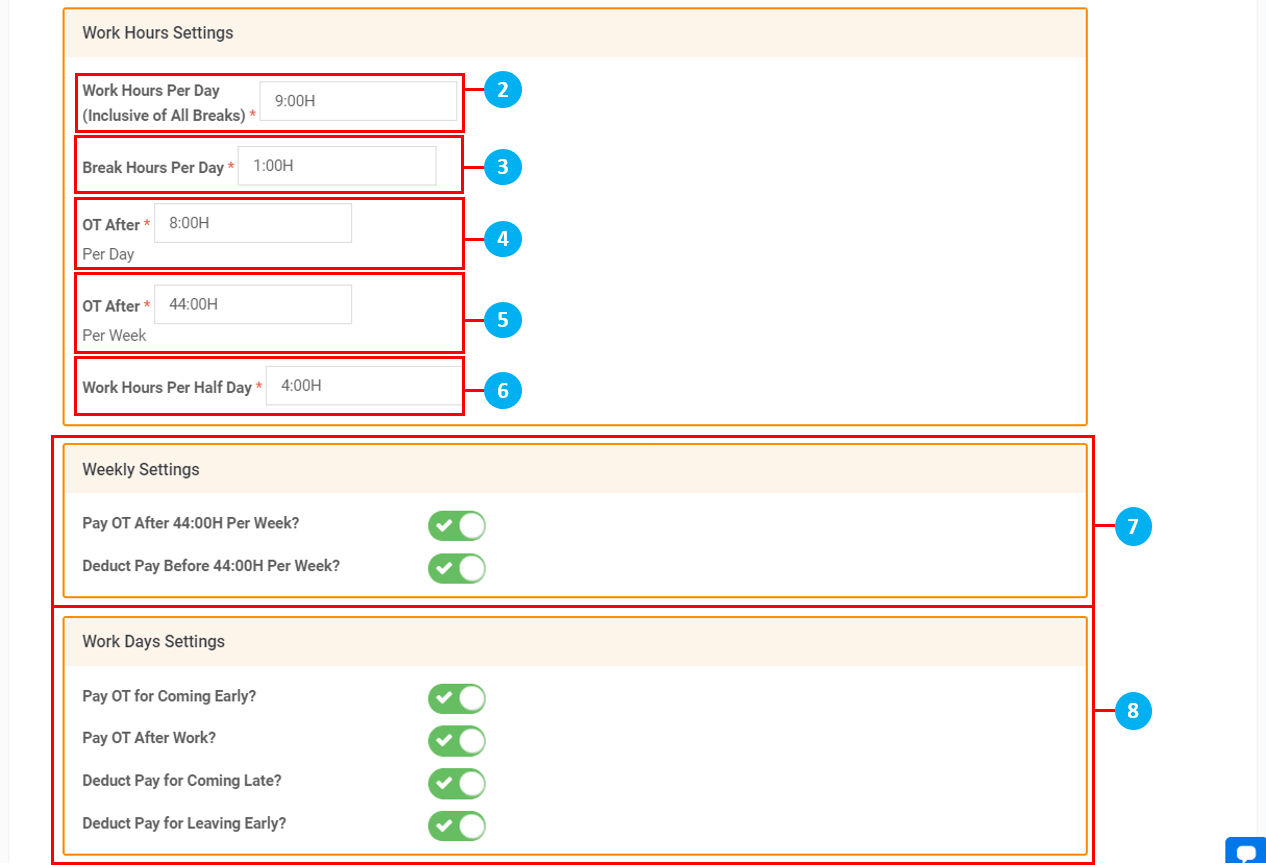
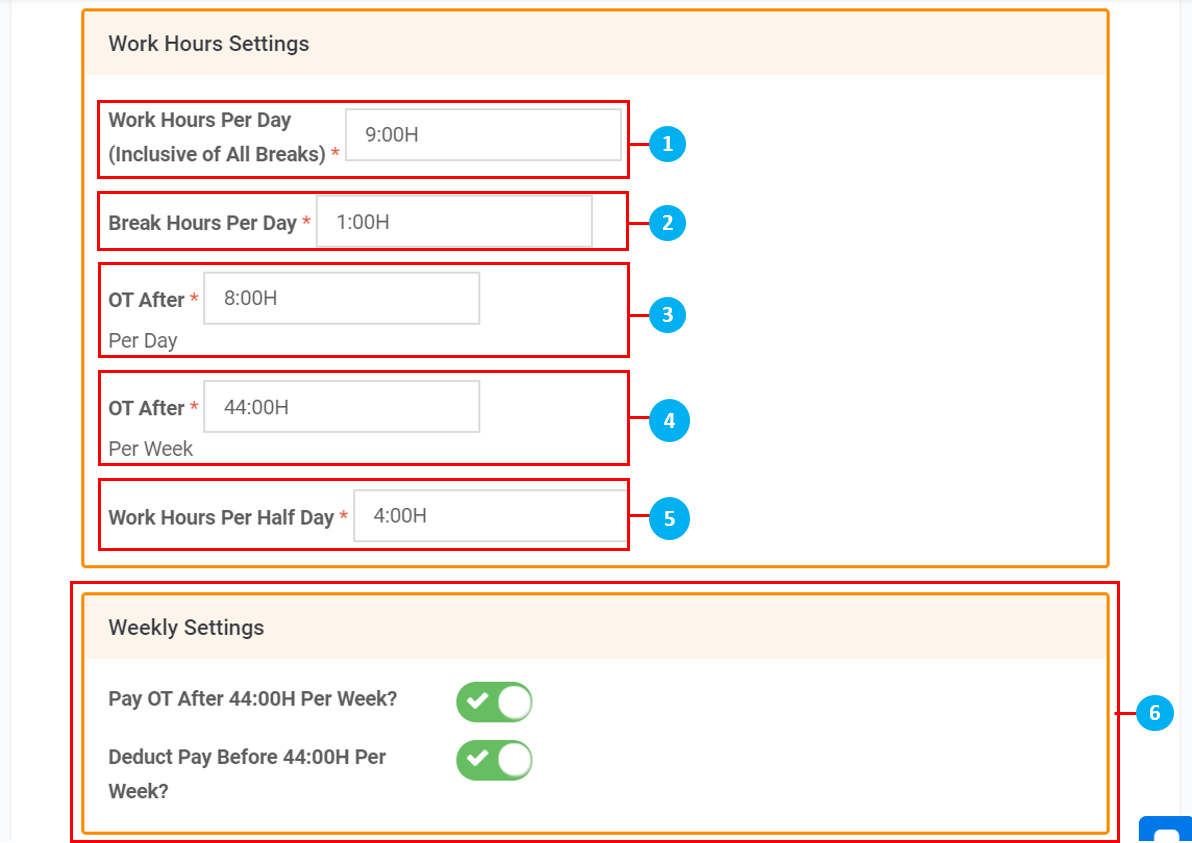
Option 1: No OT and Deductions- Key in Work Hours Per Day (Breaks Included)
- Key in Break Hours Per Day
- Key in Work Hours Per Half Day
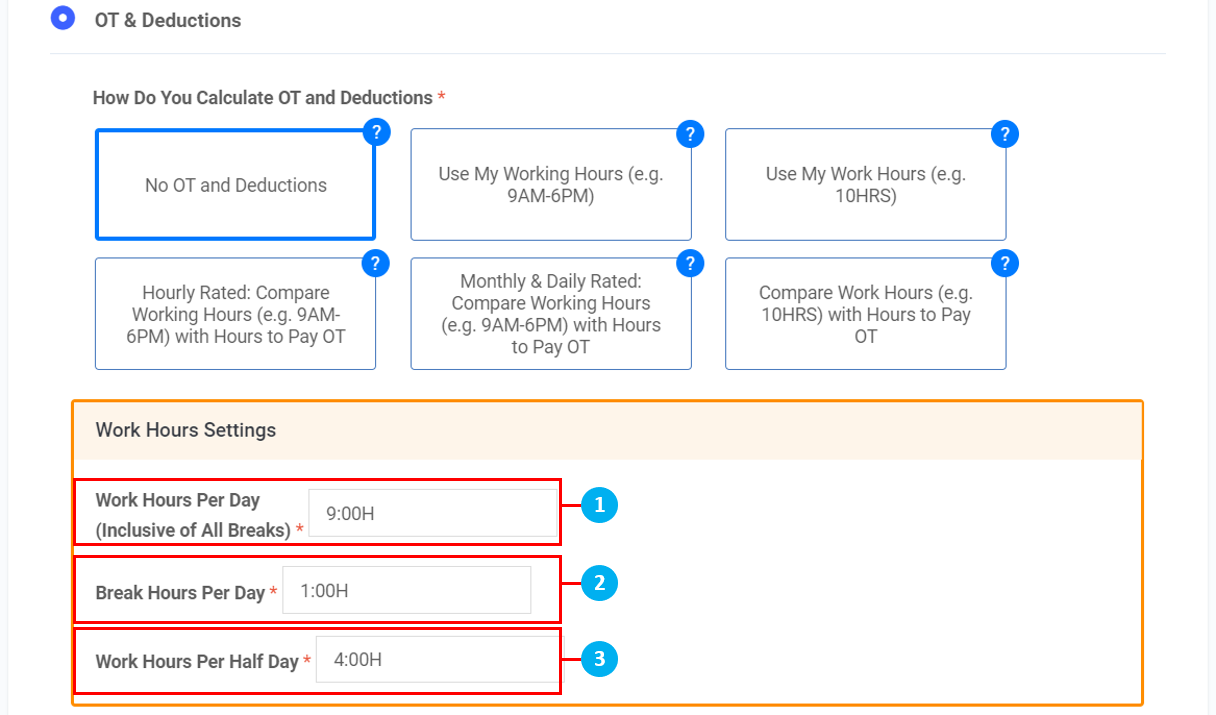
- At the bottom of the page, Click "Save"
*Note: Choose option 1 when your employees have no OT and no deductions
Option 2: Use My Working Hours (e.g 9AM - 6PM)
- Key in Work Hours Per Day (Breaks Included)
- Key in Break Hours Per Day
- Key in OT After Per Day
- Key in Work Hours Per Half Day
- Toggle Non-Work Days Settings, if required (Pay OT After 8:00H Per Day, Deduct Pay Before 8:00H Per Day)
- Toggle Work Days Settings, if required (Pay OT for Coming Early, Pay OT After Work, Deduct Pay for Coming Late, Deduct Pay for Leaving Early)
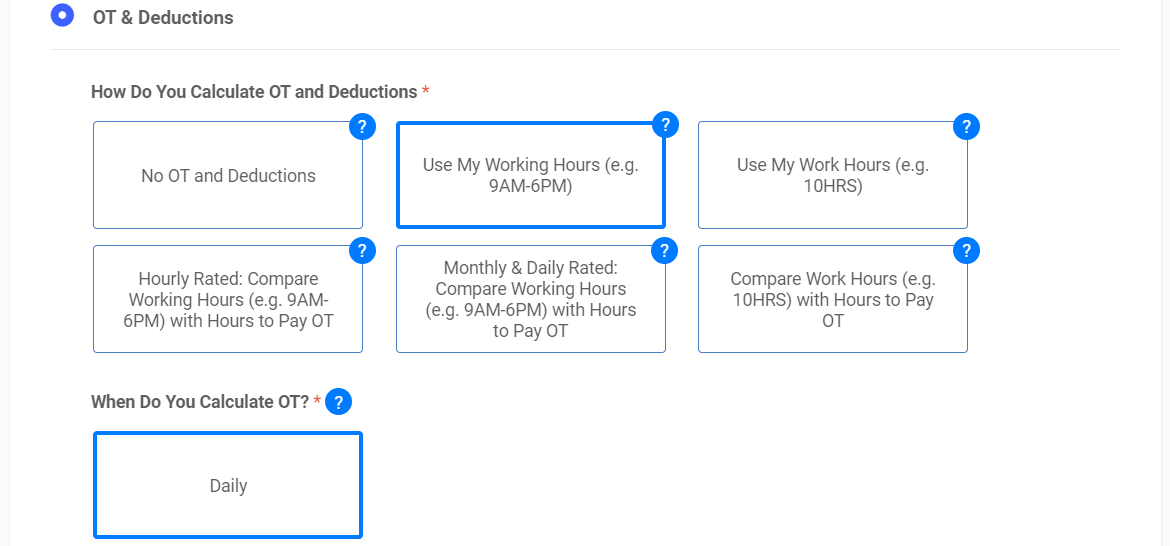
- At the bottom of the page, Click "Save"
*Note: Choose option 2 when your employees have a fixed schedule, which means a fixed start and end work time
Option 3: Use Work Hours (e.g. 10HRS)
- Key in Work Hours Per Day (Breaks Included)
- Key in Break Hours Per Day
- Key in OT After Per Day
- Key in Work Hours Per Half Day
- Toggle Non-Work Days Settings, if required (Pay OT After 8:00H Per Day, Deduct Pay Before 8:00H Per Day)
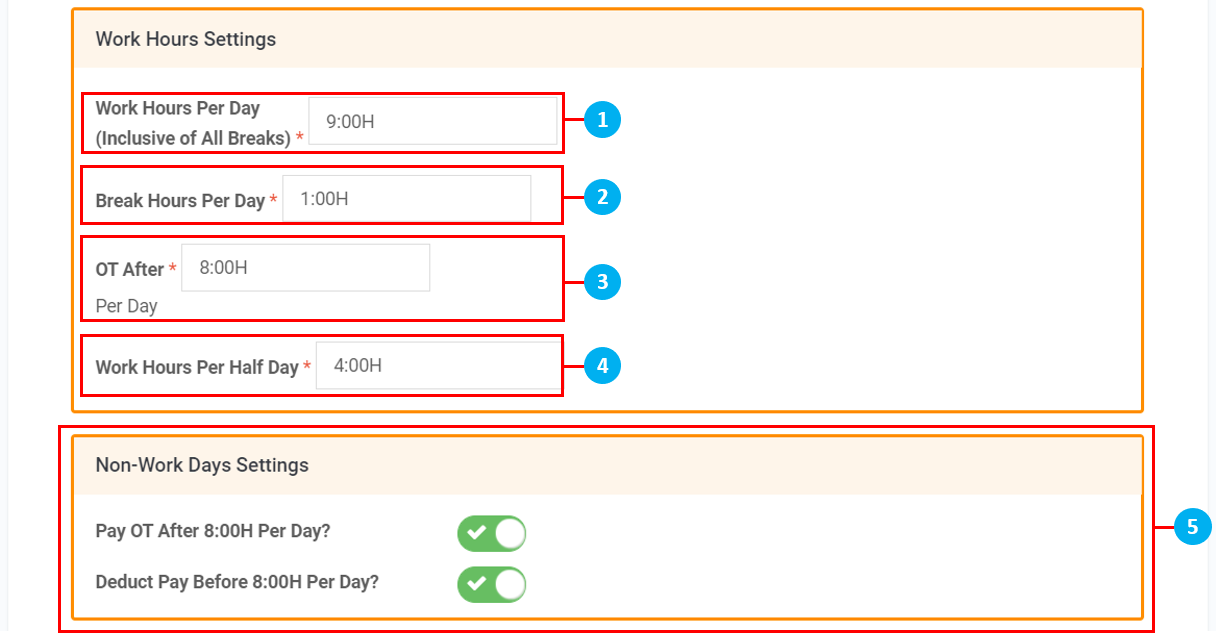
- At the bottom of the page, Click "Save"
*Note: Choose option 3 when your employees have no fixed start and end work time (e.g. Daily 10 hours of work)
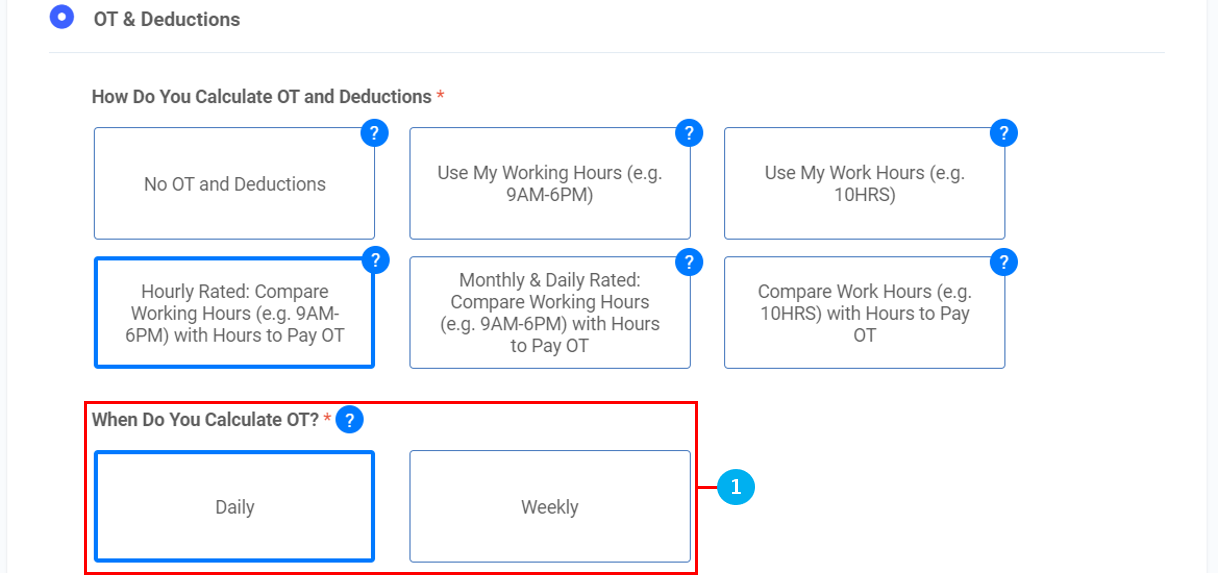
Option 4: Hourly Rated
- Select when OT is calculated (Daily, Weekly)
- Key in Work Hours Per Day (Breaks Included)
- Key in Break Hours Per Day
- Key in OT After Per Day
- Key in OT After Per Week (Applicable if OT is calculated Weekly)
- Key in Work Hours Per Half Day
- Toggle Non-Work Days Settings, if required (Pay OT After 8:00H Per Day, Deduct Pay Before 8:00H Per Day)
- Toggle Work Days Settings, if required (Pay OT for Coming Early, Pay OT After Work, Deduct Pay for Coming Late, Deduct Pay for Leaving Early)
- At the bottom of the page, Click "Save"
*Note: Choose option 4 when your employees are on a fixed schedule and are hourly rated
Option 5: Monthly & Daily Rated
- Select when OT is calculated (Daily, Weekly)
- Key in Work hours Per Day (Breaks Included)
- Key in Break Hours Per Day
- Key in OT After Per Day
- Key in OT After Per Week (Applicable if OT is calculated Weekly)
- Key in Work Hours Per Half Day
- Toggle Non-Work Days Settings, if required (Pay OT After 8:00H Per Day, Deduct Pay Before 8:00H Per Day)
- Toggle Work Days Settings, if required (Pay OT for Coming Early, Pay OT After Work, Deduct Pay for Coming Late, Deduct Pay for Leaving Early)
- At the bottom of the page, click "Save"
*Note: Choose option 5 when your employees are on a fixed schedule and are monthly / daily rated
Option 6: Compare Work Hours with Hours to Pay OT
- Select when OT is calculated (Daily, Weekly)
- Key in Work hours Per Day (Breaks Included)
- Key in Break hours Per Day
- Key in OT After Per Day
- Key in OT After Per Week (Applicable if OT is calculated Weekly)
- Toggle Non-Work Days Settings, if required (Pay OT After 8:00H Per Day, Deduct Pay Before 8:00H Per Day)
- At the bottom of the page, Click "Save"
*Note: Choose option 6 when your employees have no fixed schedule and you would like to pay monthly OT
Attendance Item
- Click "Attendance Item"
- Click "+Add"
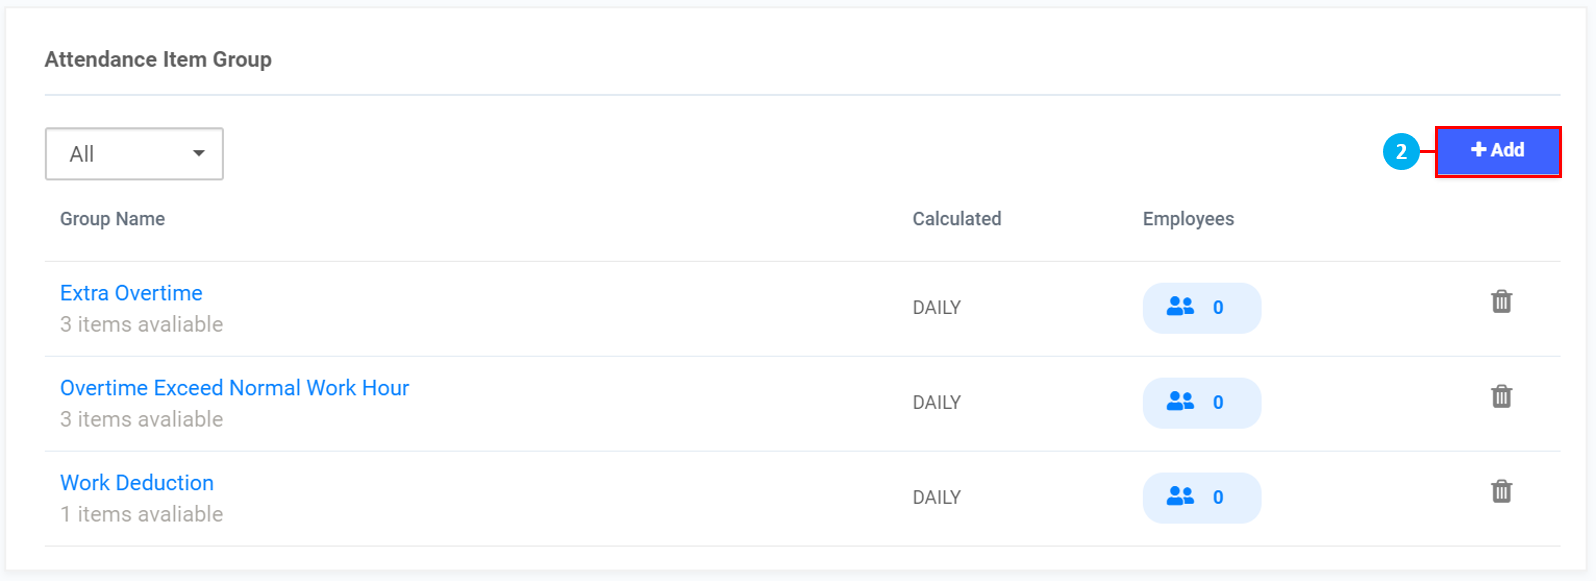
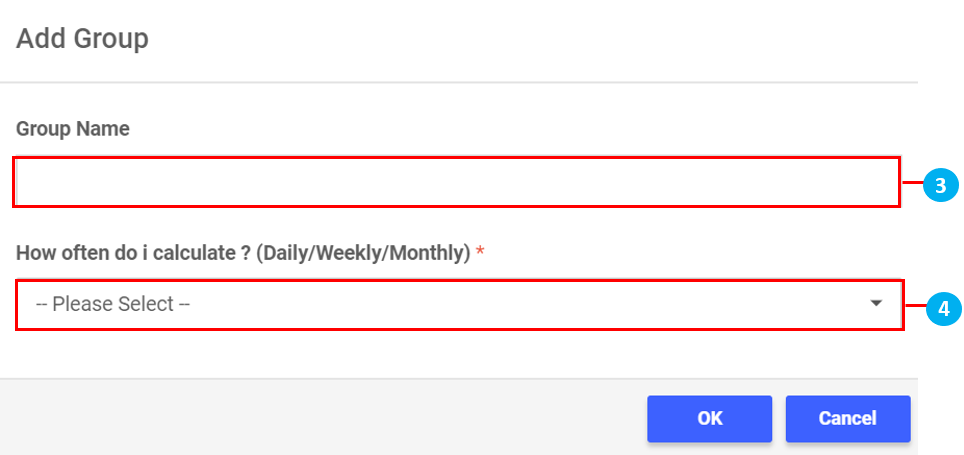
- Key in Attendance Item Group Name
- Select how often Attendance Item is calculated
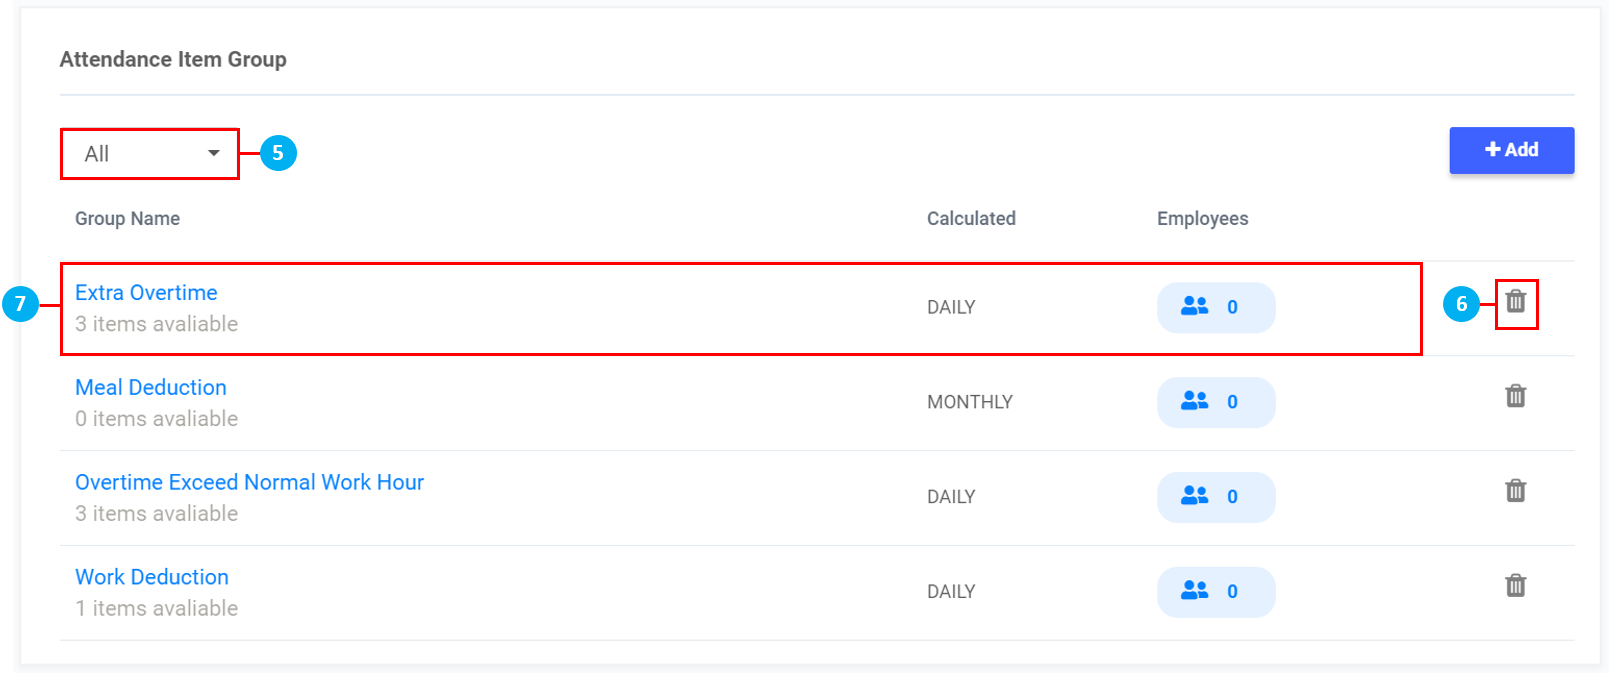
- Filter the Attendance Item Groups created by how they are calculated
- Click on the
 icon to delete Attendance Item Groups
 - Click on any Attendance Item Group to edit the settings
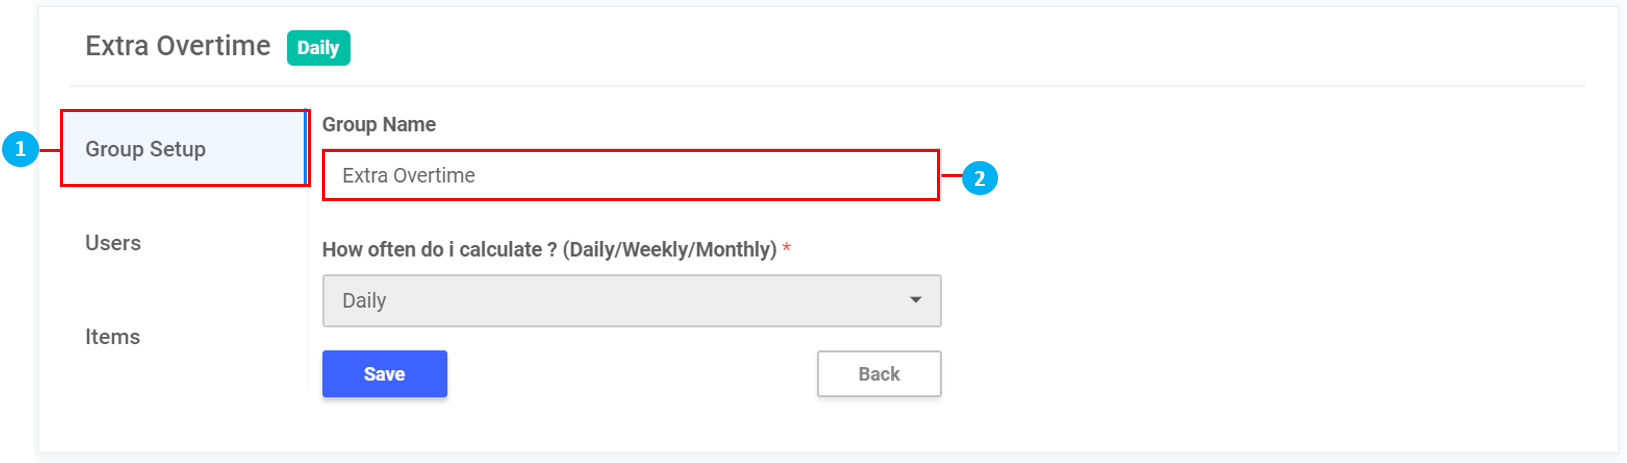
Group Setup
- On the left sidebar menu, click "Group Setup"
- Key in a different Group Name, if required
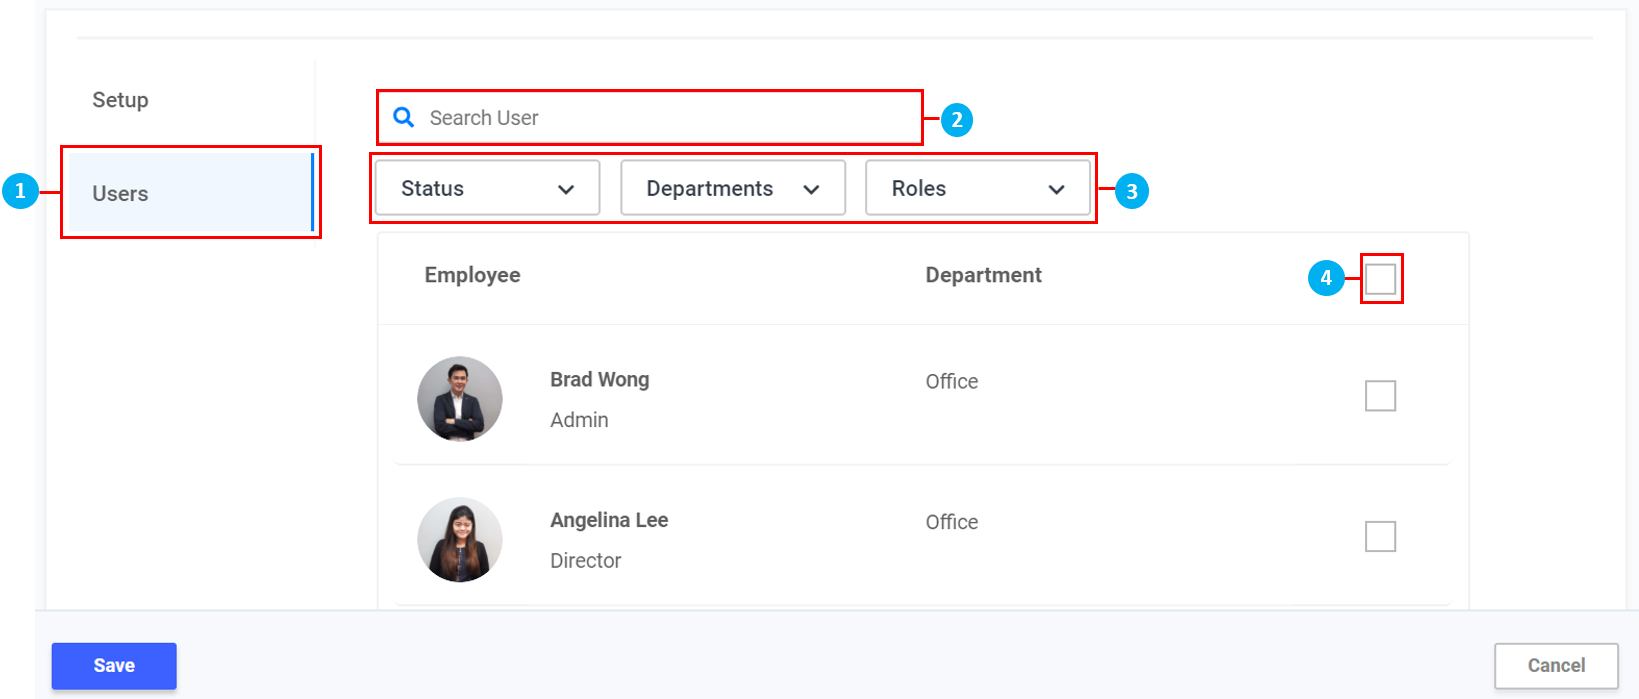
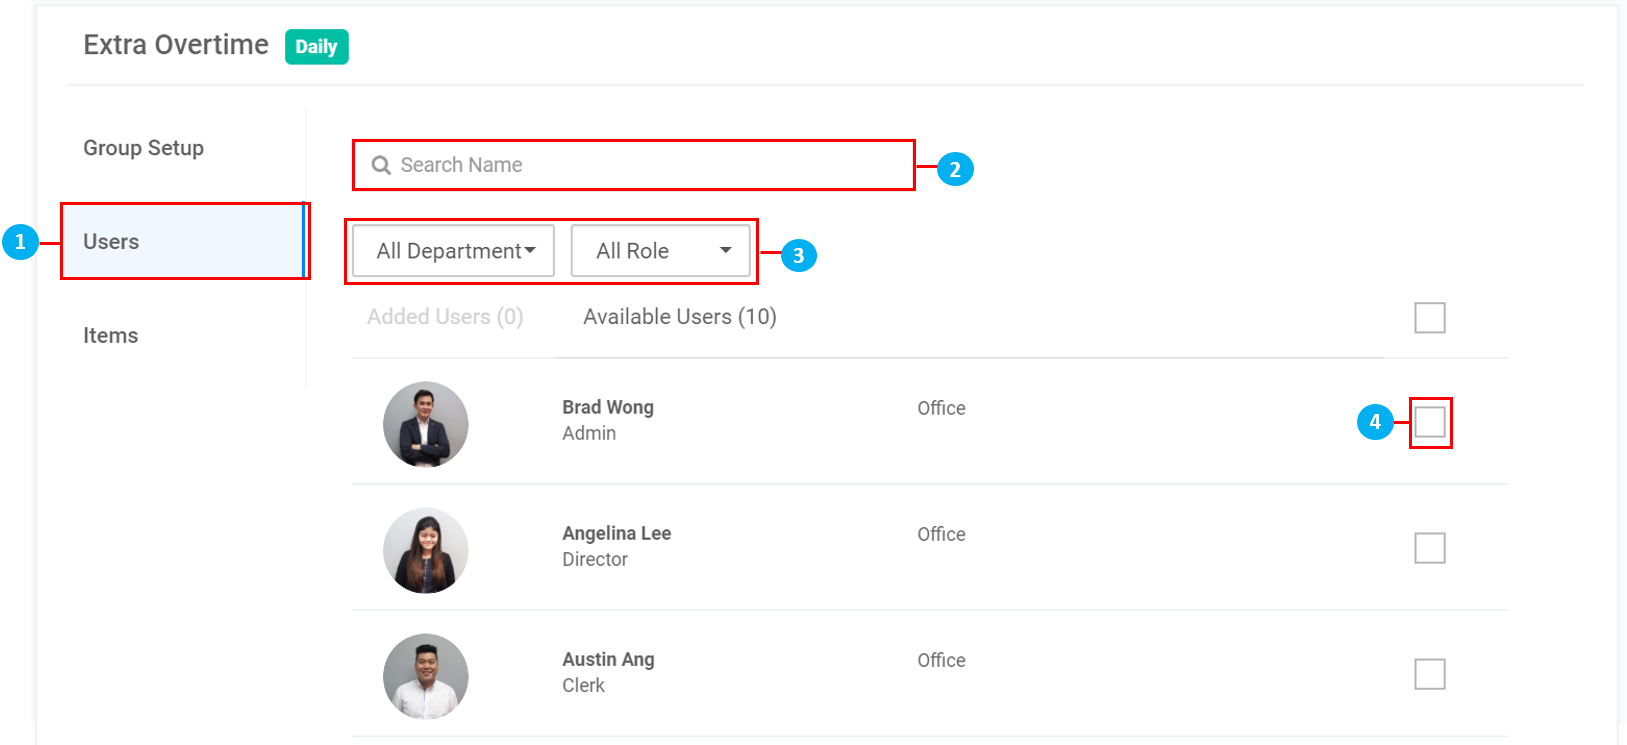
Users
- On the left sidebar menu, click "Users"
- Search for Users by name
- Filter Users by Department / Role
- Select Users to add Attendance Item Group
- At the bottom of the page, click "Assign Selected"
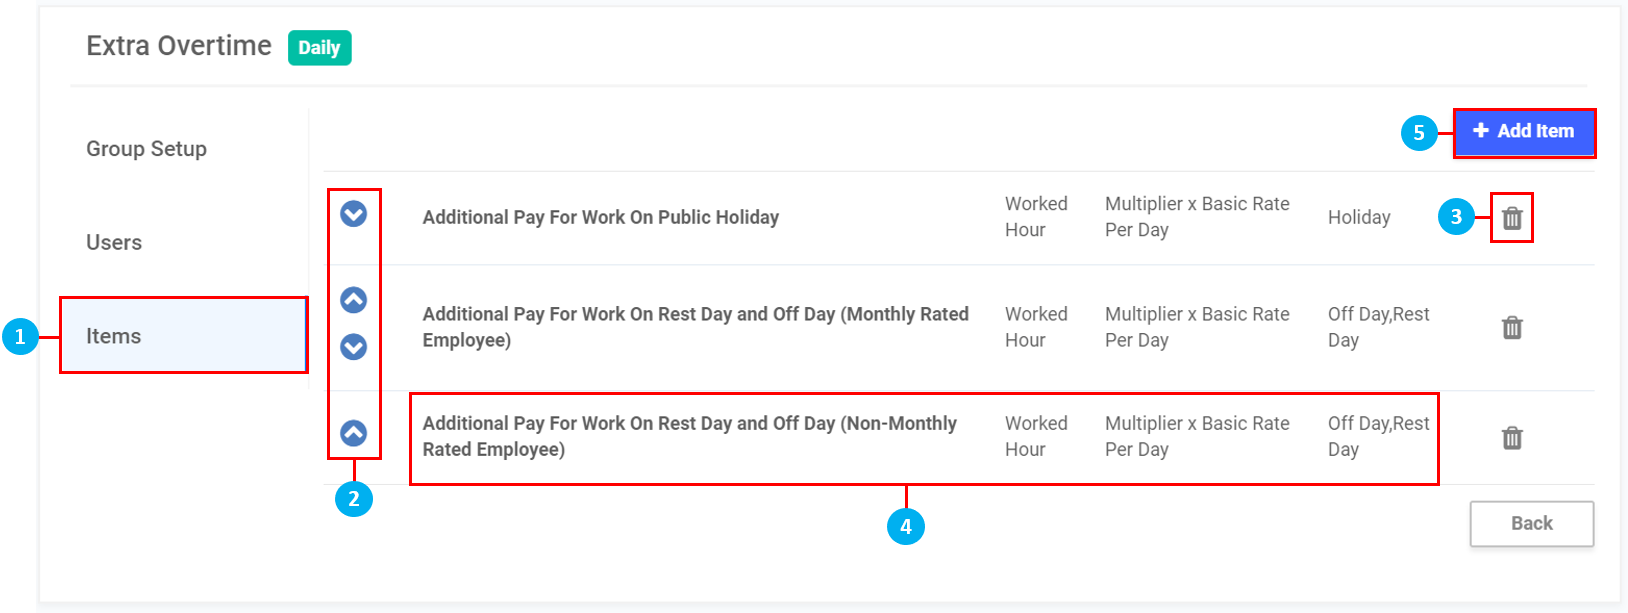
Items
- On the left sidebar menu, click "Items"
- Rearrange the Attendance Items using the arrows
- Click on the
 icon to delete the Attendance Item
 - Click on the Attendance Item row to make amendments (*Note: The steps will be the same as "+Add Item" in Step 5 below)
- Click on "+Add Item" to add a new Attendance Item to the Attendance Item Group
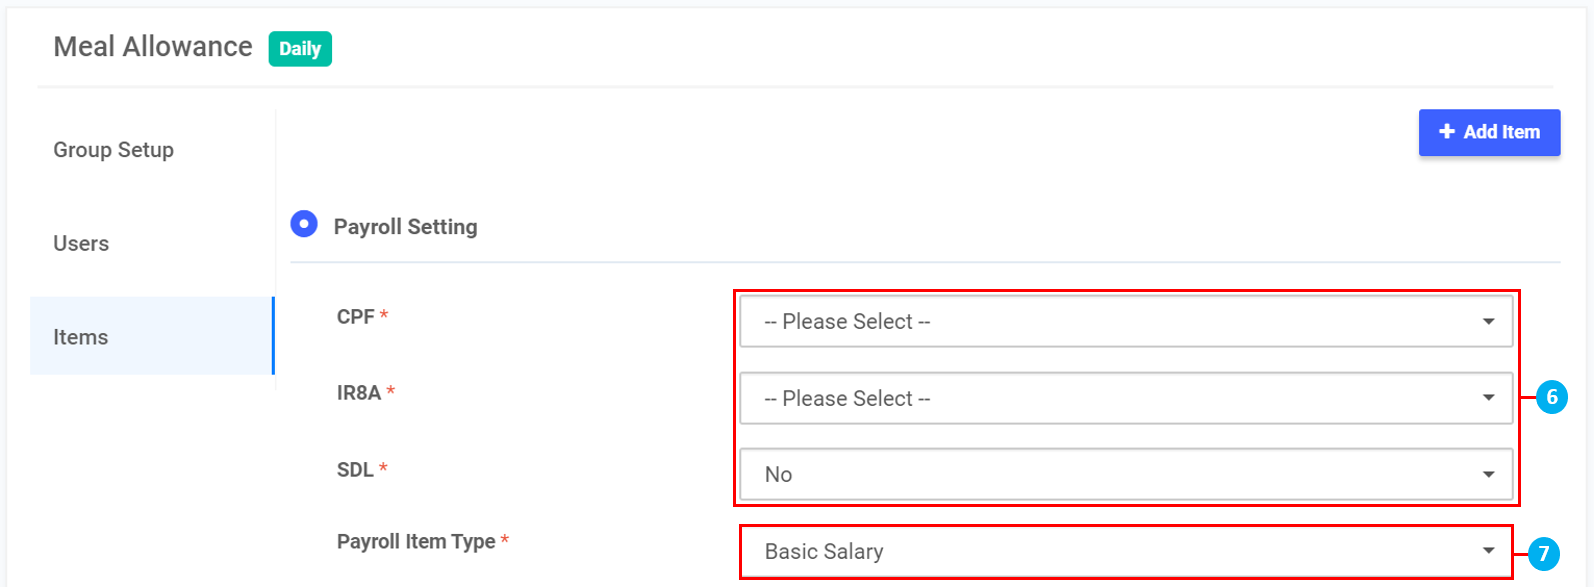
- Click to select if EPF / SOCSO/EIS / HRDF is applicable
- Click to select if Payroll Item Type applies to Basic Salary or Overtime
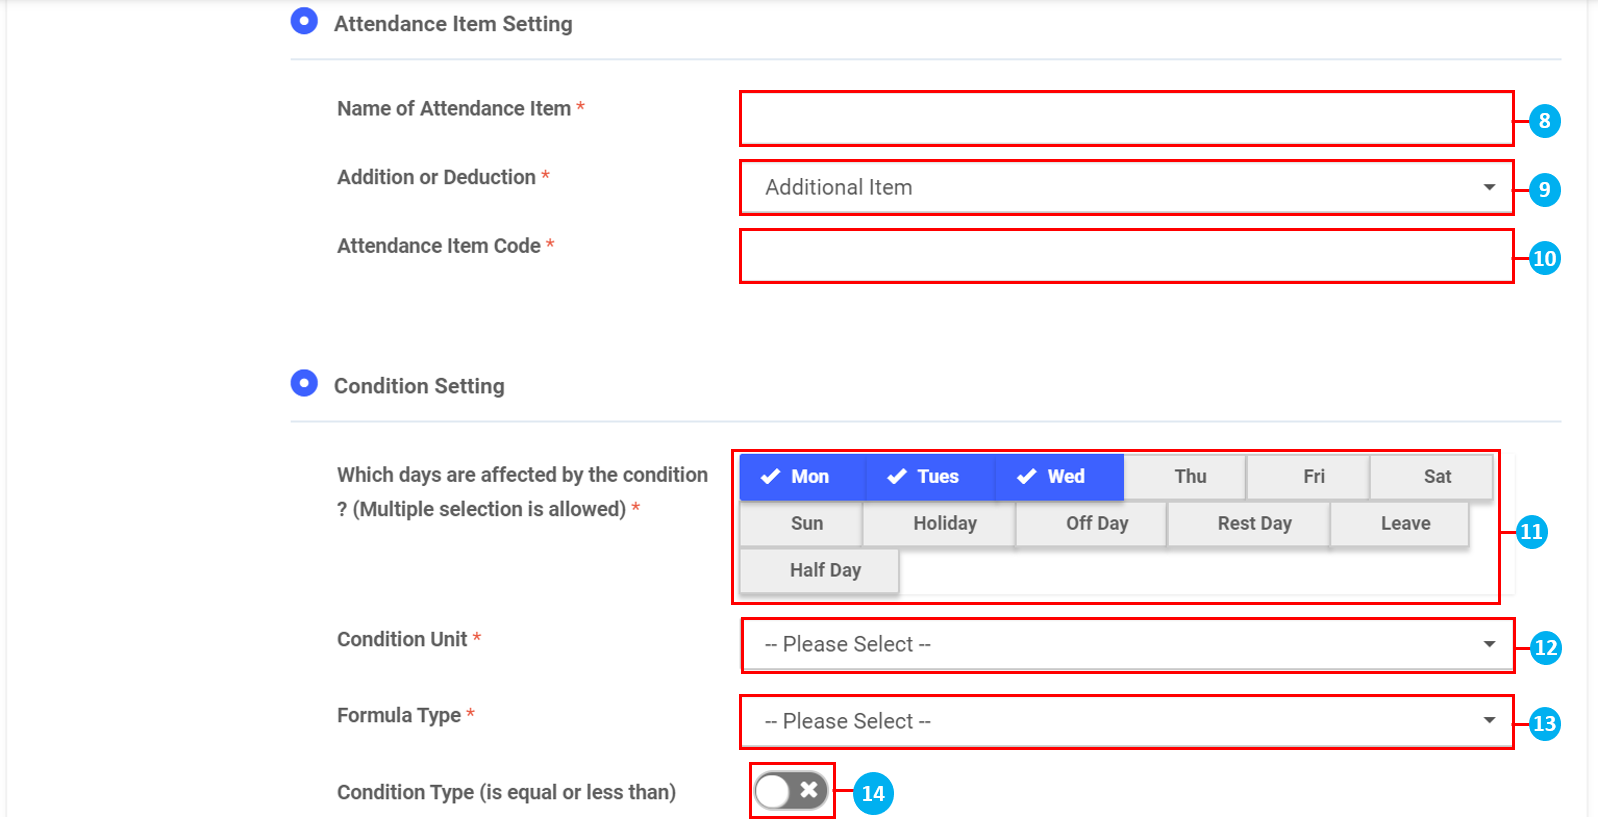
- Key in Name of Attendance Item
- Click to select if Attendance Item is an Addition or Deduction item
- Key in the Attendance Item Code
- Click to select which days are affected by the Attendance Item
- Click to select the Condition Unit of the Attendance Item
- Click to select the Formula Type of the Attendance Item
- Based on your selections for Condition Unit and Formula Type, other fields will appear to:
- Toggle if the Condition Type is equal or less than
- Key in Custom Rate
- Select Payout Unit
- Toggle to display calculation details for Payslip and Finalized Payslip
- Select the Clock Type
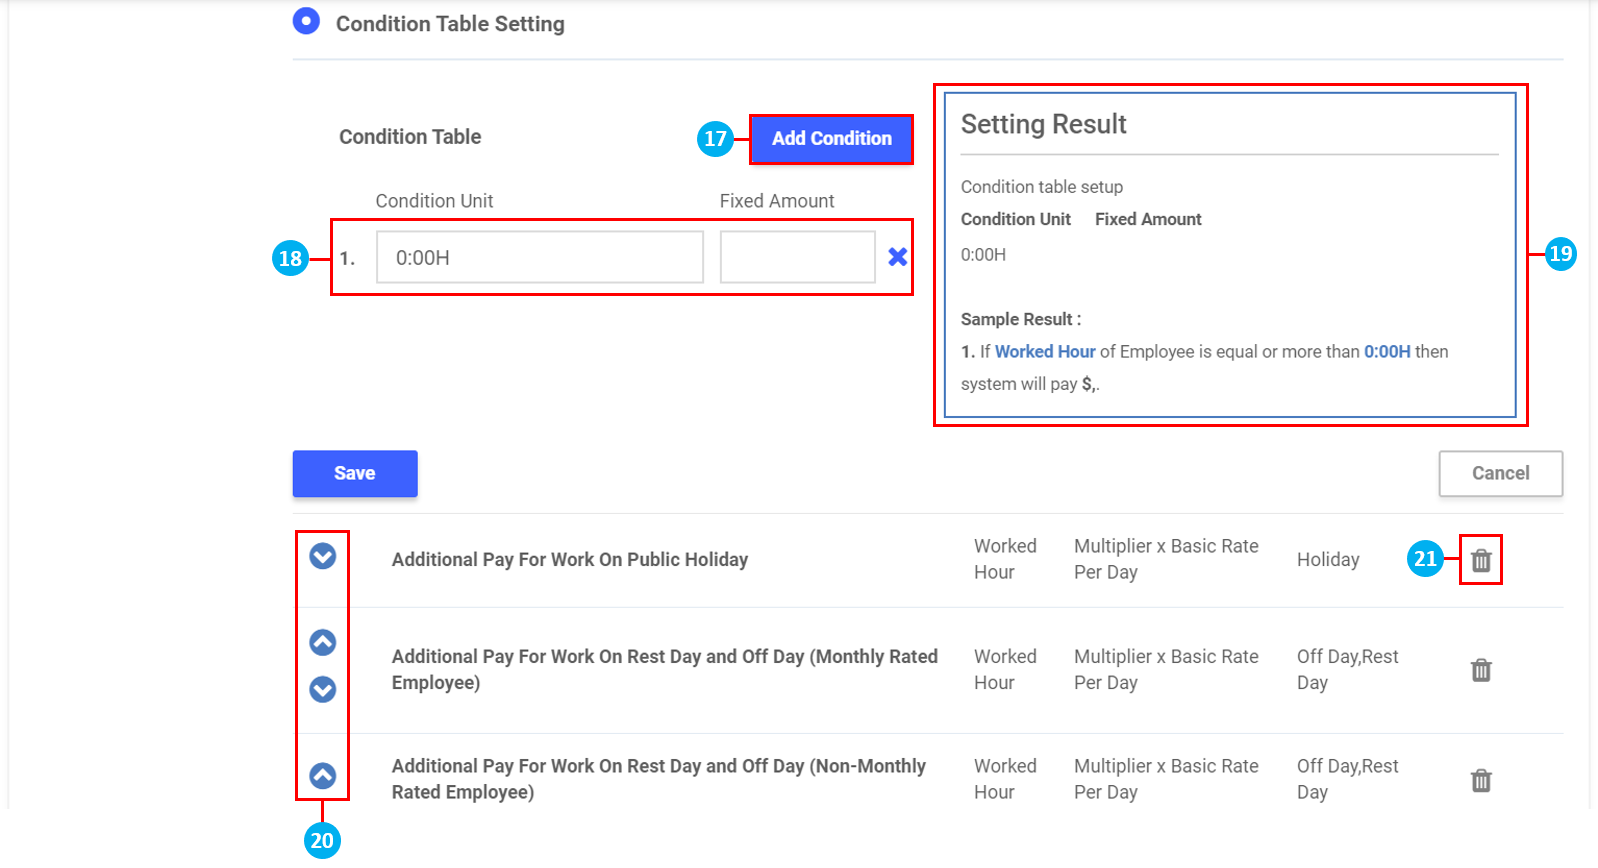
- Click Add Condition for this Attendance Item if required
- Key in the Condition Unit and Fixed Amount to be paid. Click 'x' to delete if required. Once done, click Save.
- View a summary of the Setting Result configured here. The Sample Result will clarify the settings created above.
- Rearrange the Attendance Items using the arrows
- Click on the icon to delete the Attendance Item
Rounding Rule Group
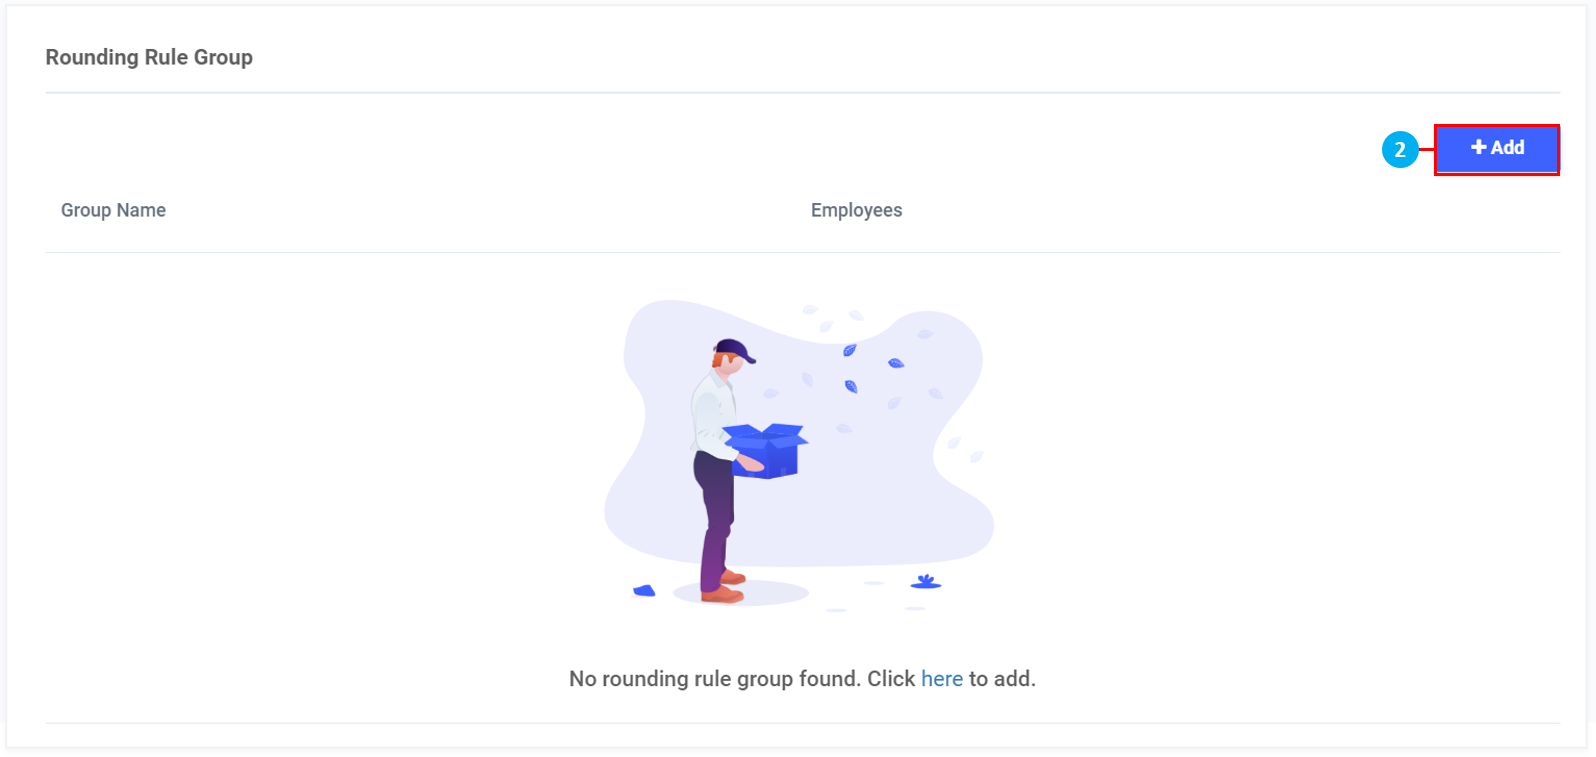
- Click "Rounding Rule Group"
- Click "+Add"
- Key in Group Name
- Select whether Rounding Frequency is based on Daily or Weekly
- Select the various Rounding Rules from the drop down lists
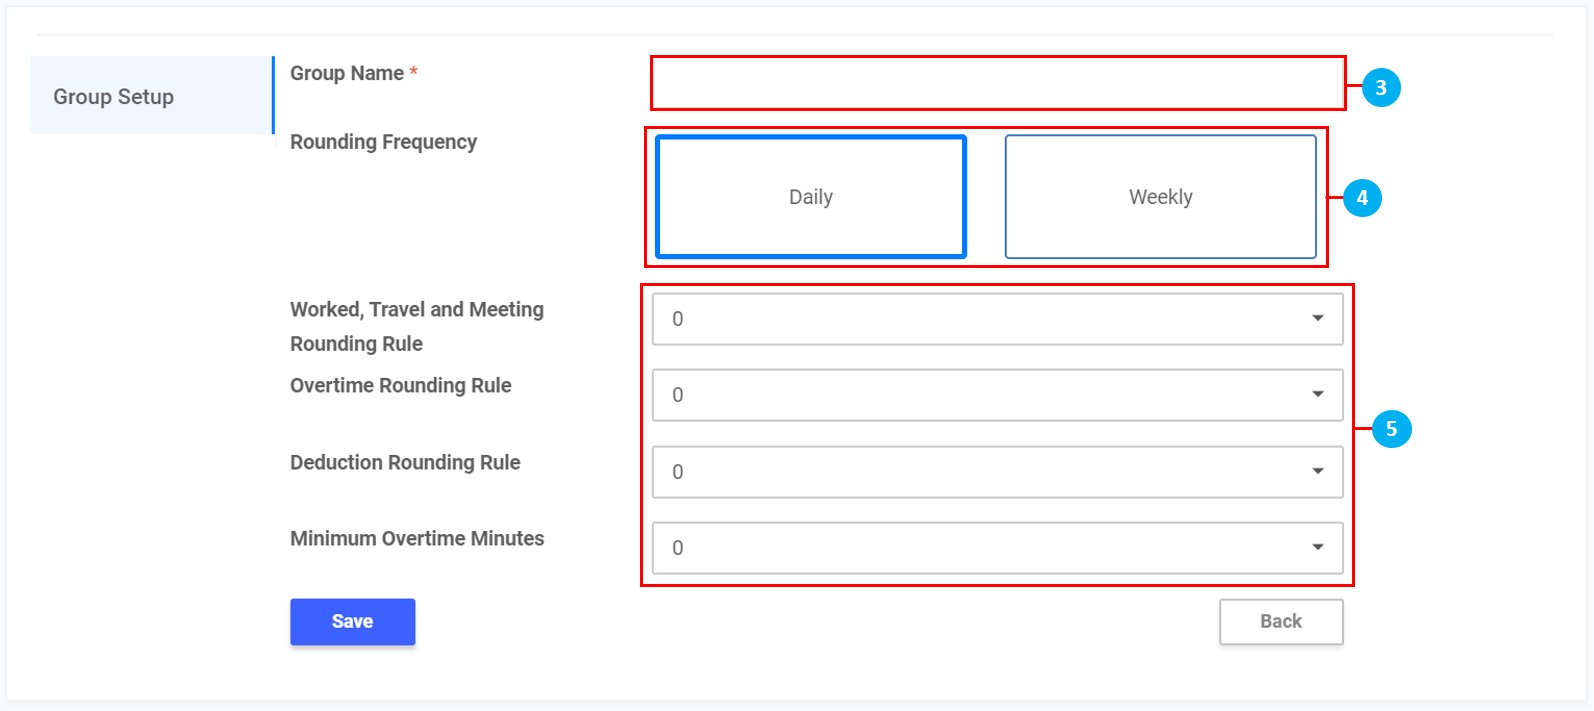
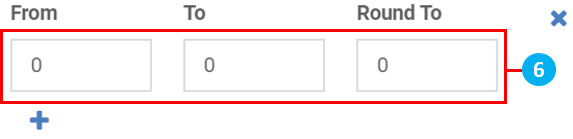
- If "Custom" is selected, key in the time in minutes for From and To, and key in the minute to Round To e.g. Overtime Rounding Rule - If any Employee works Overtime of between 1 to 14 minutes, their Overtime will be round to 15 minutes. Once done, click "Save"
Auto Acknowledge
- Click "Auto Acknowledge"
- Click on the toggle to Enable Auto Acknowledge
- Click on the toggle to Configure Users By Group (*Note: Do not use this function if you would like to Enable Auto Acknowledge to all users as a global setting)
- Click "+Add" to create User Group

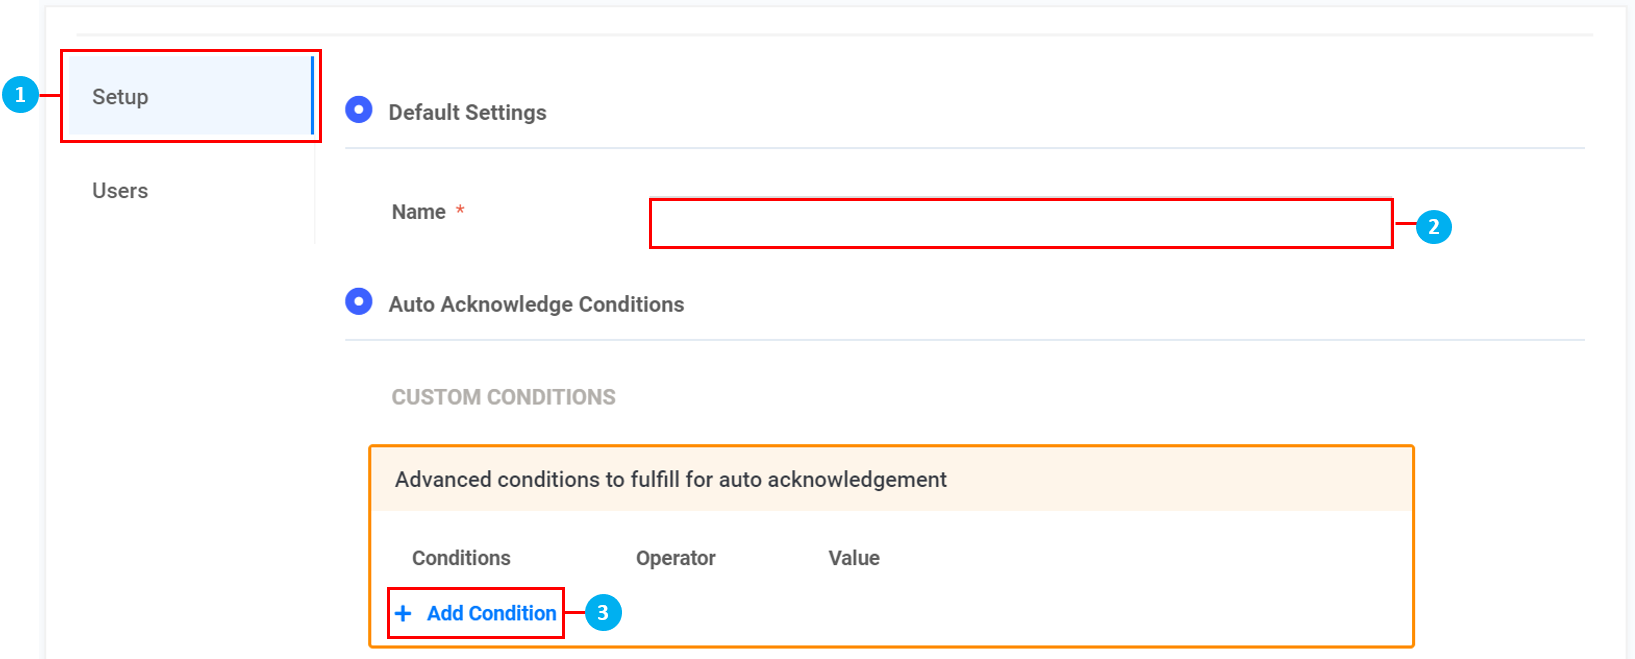
Setup
- On the left sidebar menu, click "Setup"
- Key in the name for this User Group
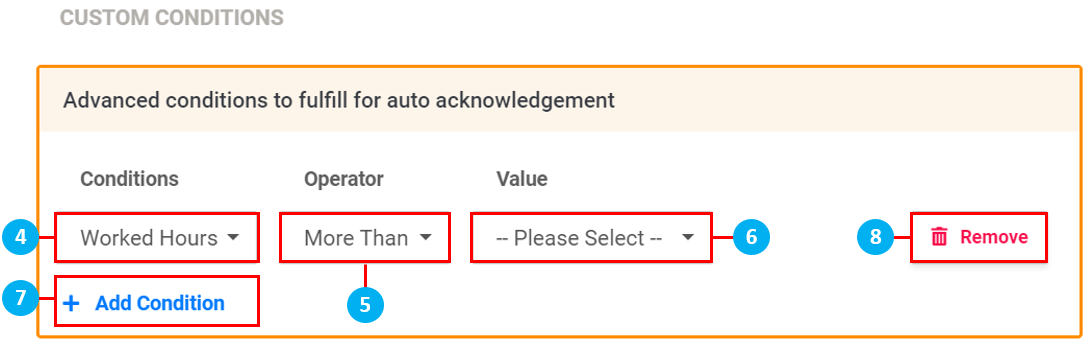
- Click "+ Add Condition" to add custom conditions for this User Group
- Click to select the Condition
- for the Condition
- Click to select the Value (*Note: If "Custom" is selected, another box will appear to key in the custom value)
- Click "+ Add Condition" to add more custom conditions for this User Group if required
- Click "Remove" to remove individual custom conditions if required
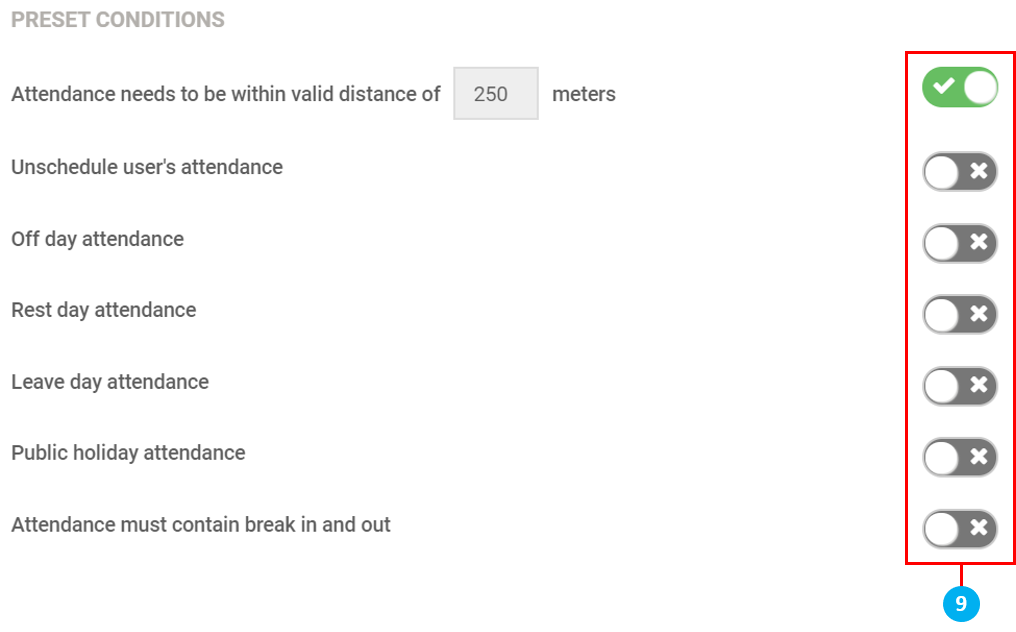
- Use the toggle switches to select which preset conditions to apply (*Note: These steps below also apply when "Configure Users By Group" has not been enabled. The settings will then apply for all users as a global setting)
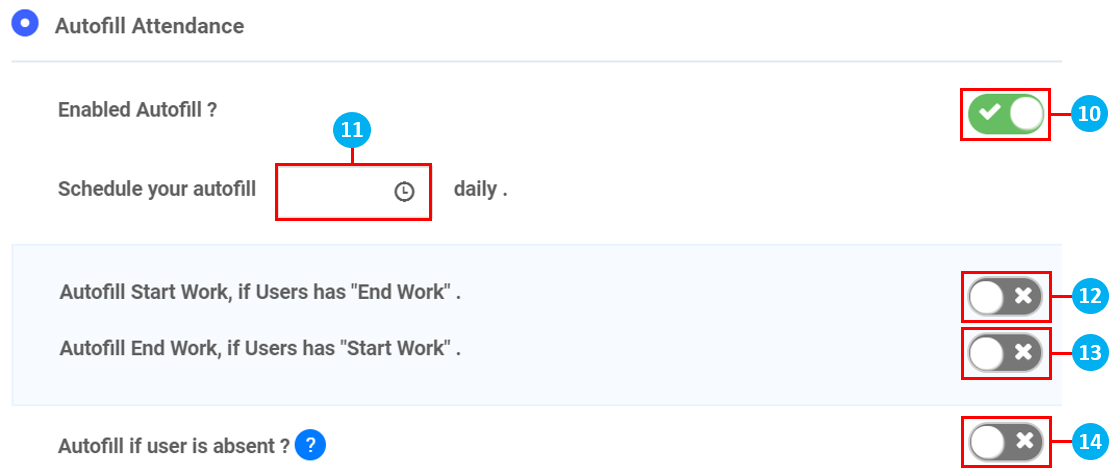
- Click on the toggle to Enable Autofill Attendance
- Click on the
 icon to configure the time for the system to autofill attendance daily
 - Click on the toggle to autofill a missing Start Work timing if User has ended work that day
- Click on the toggle to autofill a missing End Work timing if User has started work that day
- Click on the toggle to autofill if User is absent (*Tip: Click on the
 icon to get an explanation of this function)
 - Once done, click Save
Users
- On the left sidebar menu, click "Users"
- Search for an Employee using the search bar if required
- Filter by Status / Departments / Roles if required
- Click to select the Employee(s)
- Once done, click Save