Before you can conduct a payroll run, you have to ensure that the following steps
Payroll Generation
Step 1: Getting Started
Step 2: Defining your Payroll Components
Step 3: Adding/Removing Users from Payroll Batch
Step 4: Editing Payslips - Adding Allowances, Additional Payments and Deductions
Step 5: Finalizing your Payroll
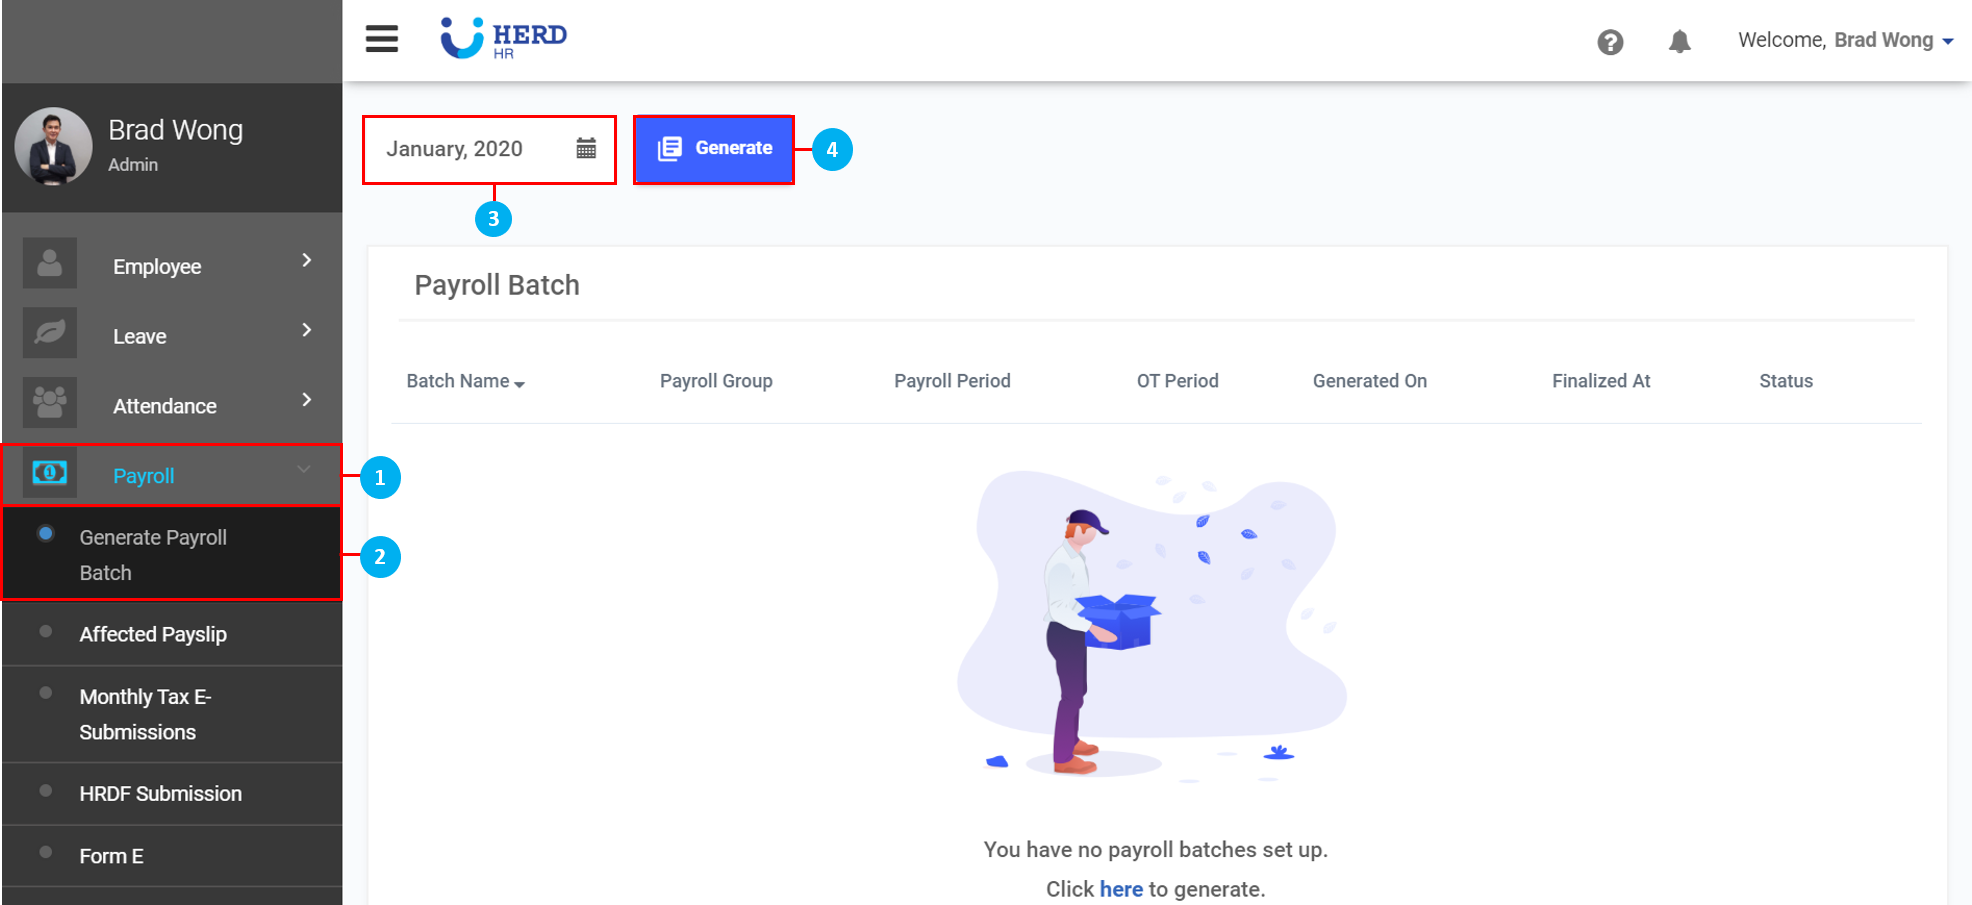
Step 1: Getting Started
- On the left sidebar menu, Click Payroll
- Click Generate Payroll Batch
- Select your intended Month for Payroll
- Click Generate
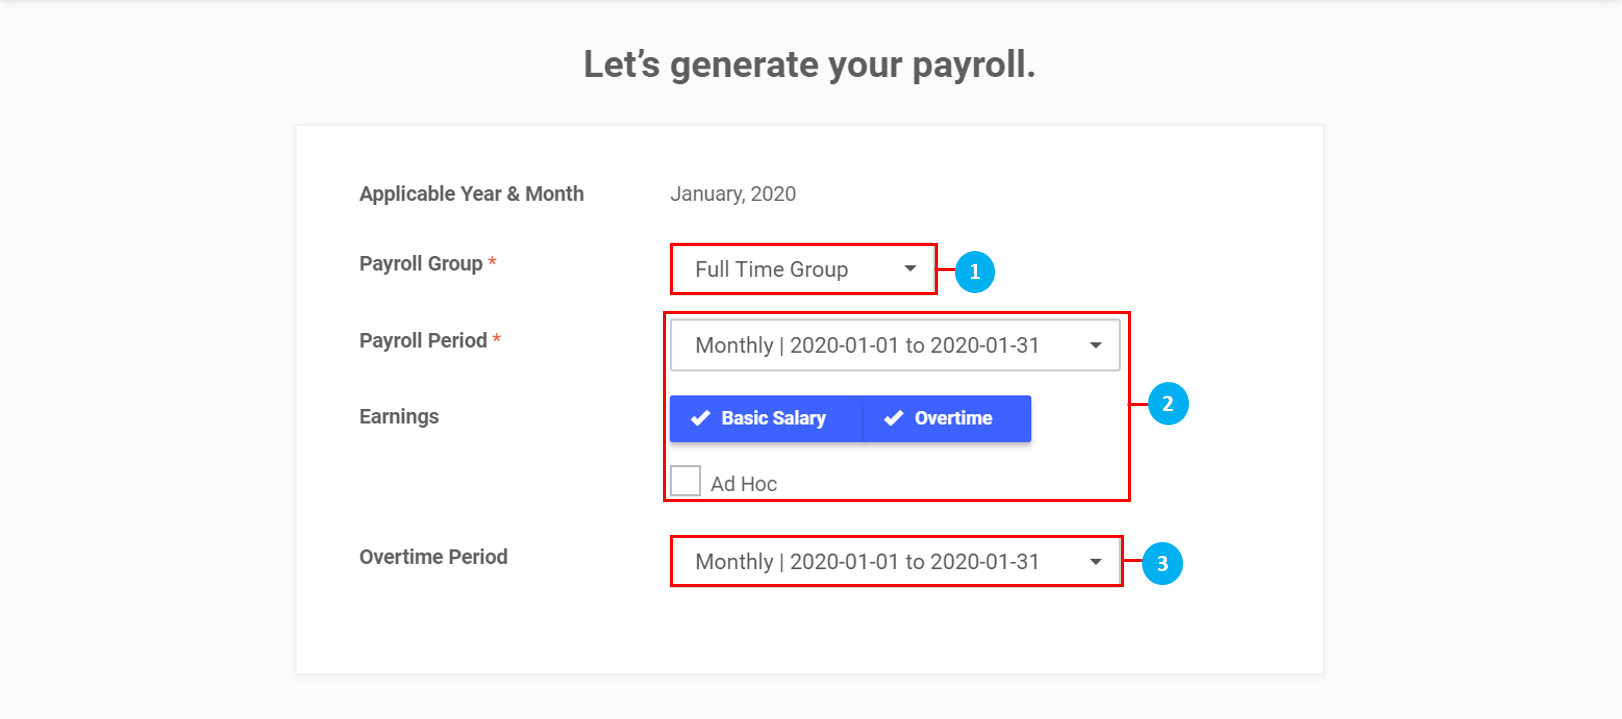
Step 2: Defining your Payroll Components
- Select Payroll Group from the drop down list (*Note: Payroll Period Groups are configured here)
- Select the Earnings to be included in the Payroll Group
- Select the Overtime Period from the drop down list if Overtime is selected to be included in the Payroll Group
- Click Next Step
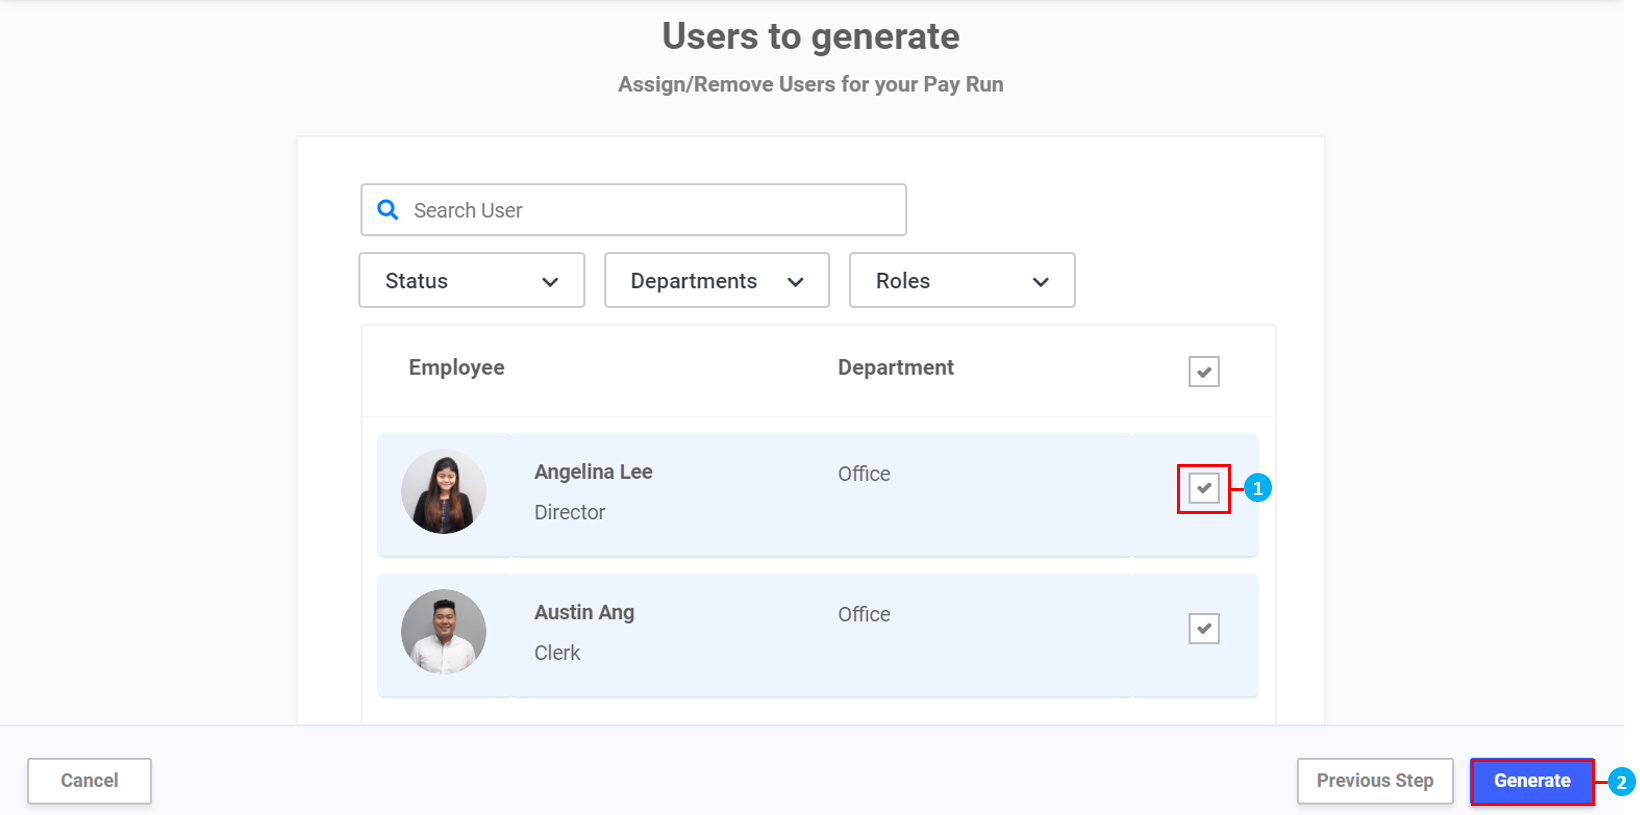
Step 3: Adding / Removing Users from Payroll Batch
- Check box to select individual employees.
- Click Generate
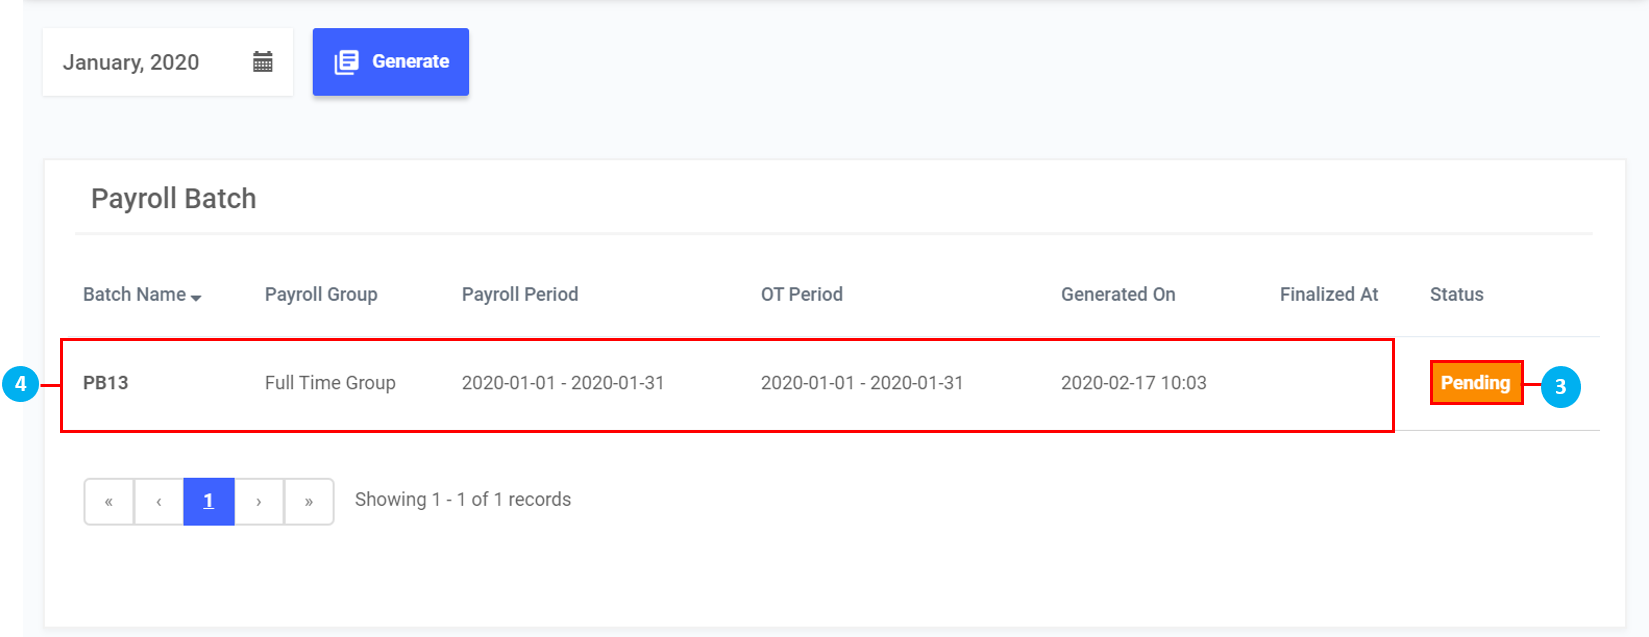
- Your Payroll is now being generated. Status will become "Pending" once it's done.
- Click anywhere on the Payroll Batch record to access Payroll Batch
Step 4: Editing Payslips - Adding Allowances, Additional Payments and Deductions
- After clicking on a Payroll Batch, click on an Employee to view their payslip.
- Click on Action > Payslip Leave to view all Leave taken during this Payroll period.
- Click on the

 icons to switch between the payslips of Employees in the list below.
 - Use the search bar to search for a particular Employee.
- Select an Employee from the list.
- Click on the icons to hide / unhide the Employee list.
- Click on the
 icon to edit the Basic Pay. Once done, click the
  icon to Save.
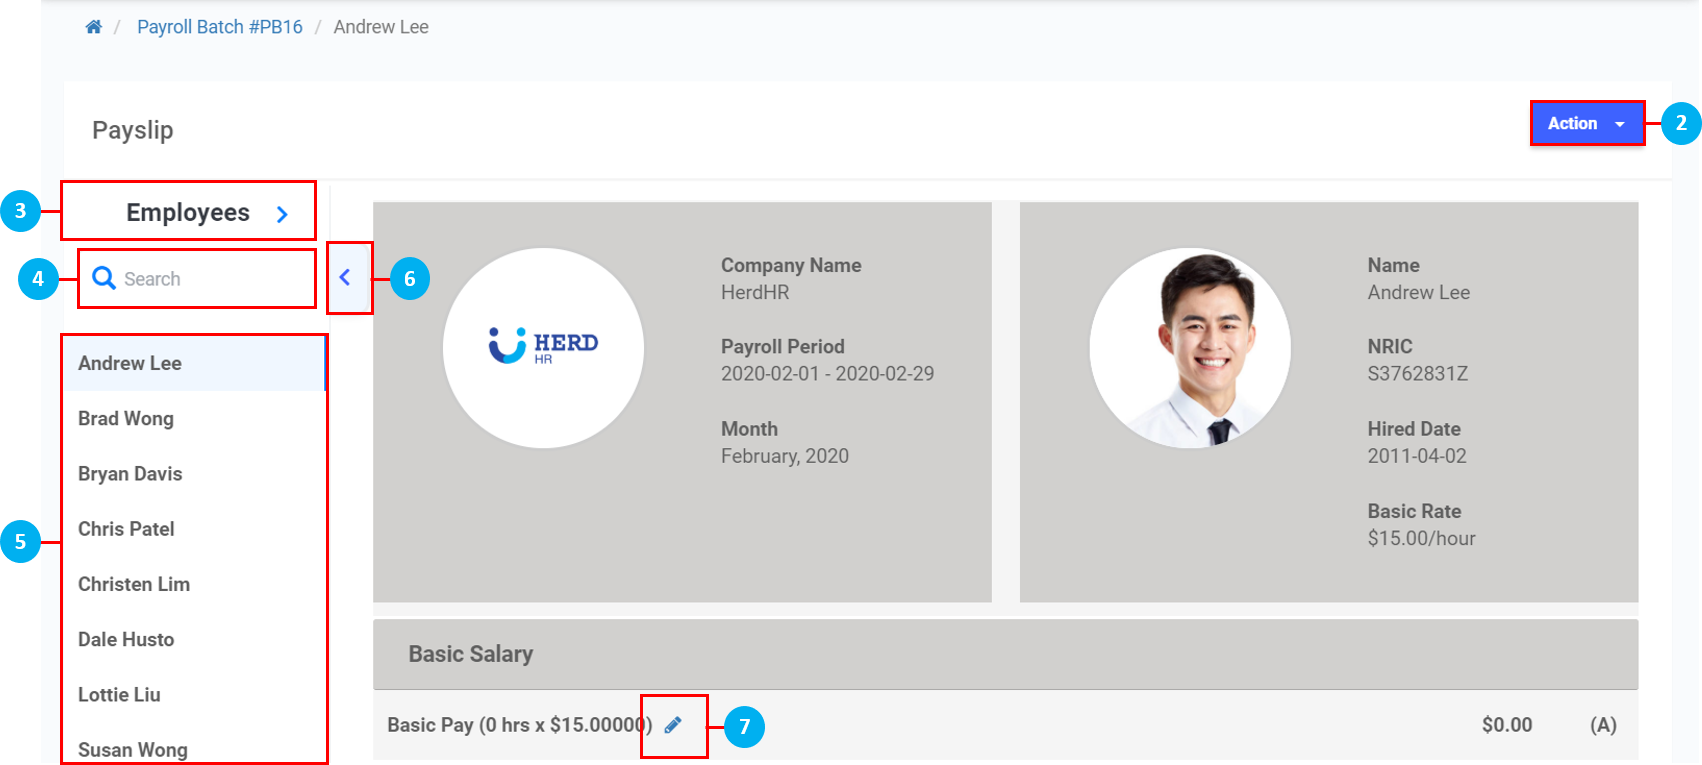
- Click on the
 icons to add Allowance, Additional Payment and Deduction, if required. (*Note: Click on the "x" to delete any created Allowances, Additional Payments or Deductions if necessary.)
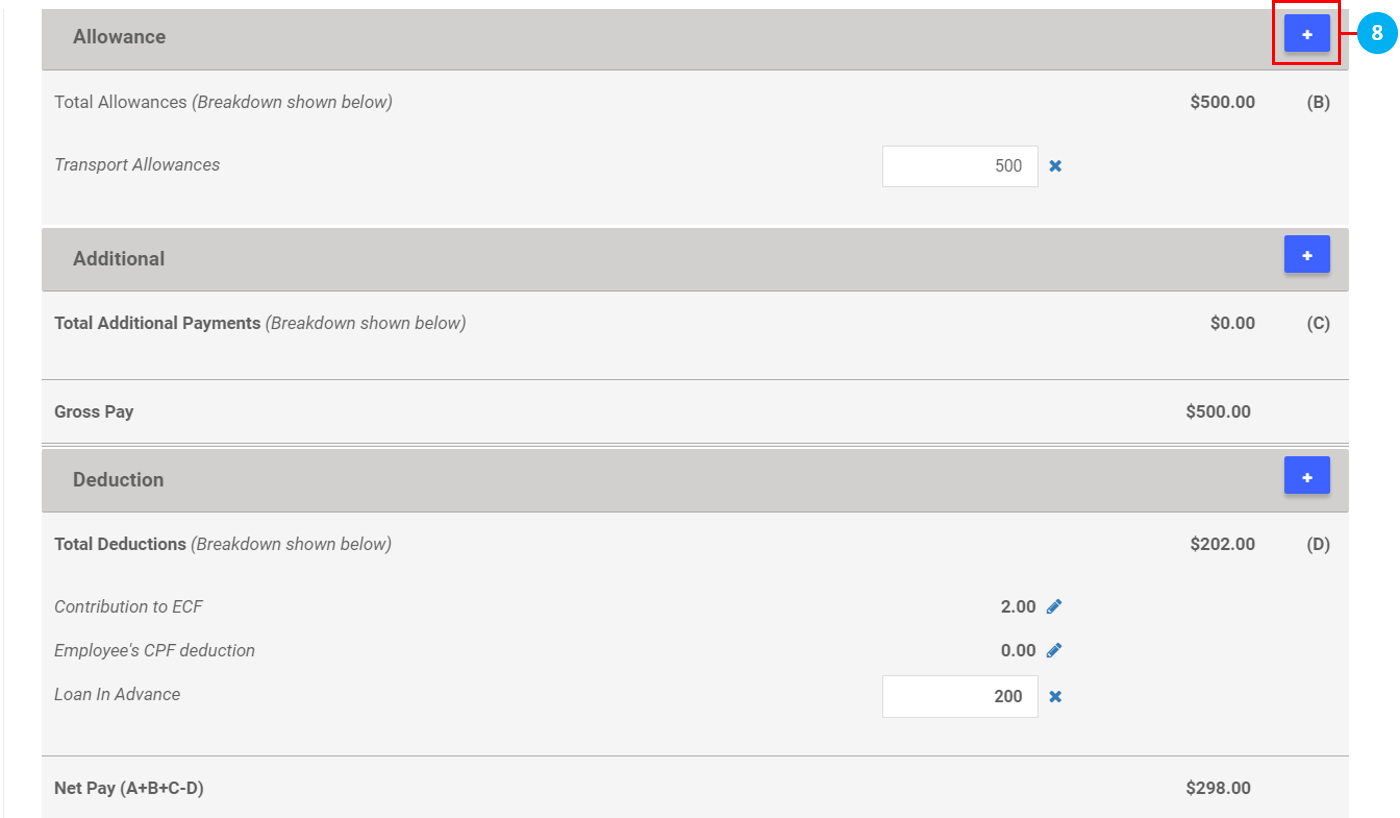
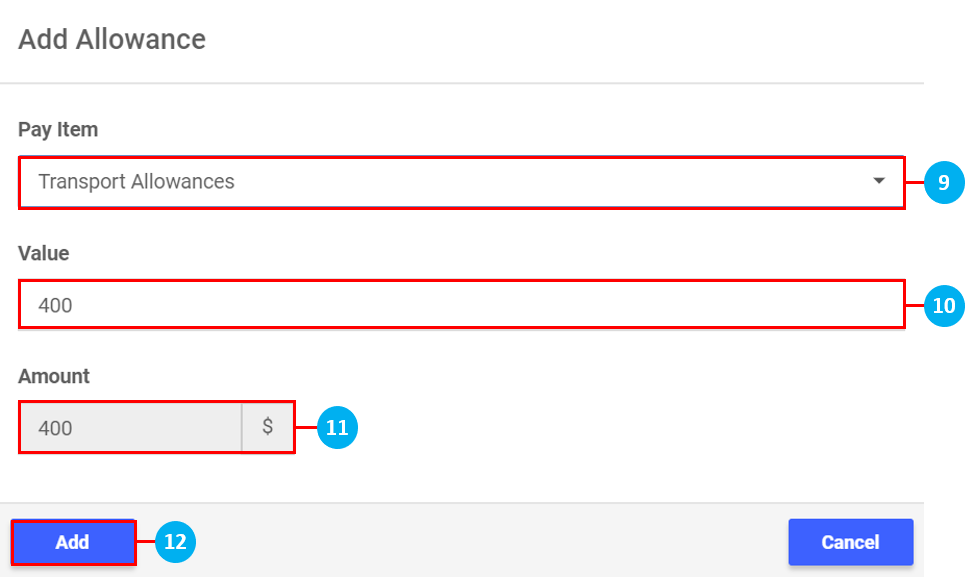
- Select a Pay Item from the drop down list. (*Note: These Pay Items would have already been created here.)
- Key in the Value.
- The Value entered will be reflected here for confirmation.
- Once done, click Add to add this item to the Payslip.
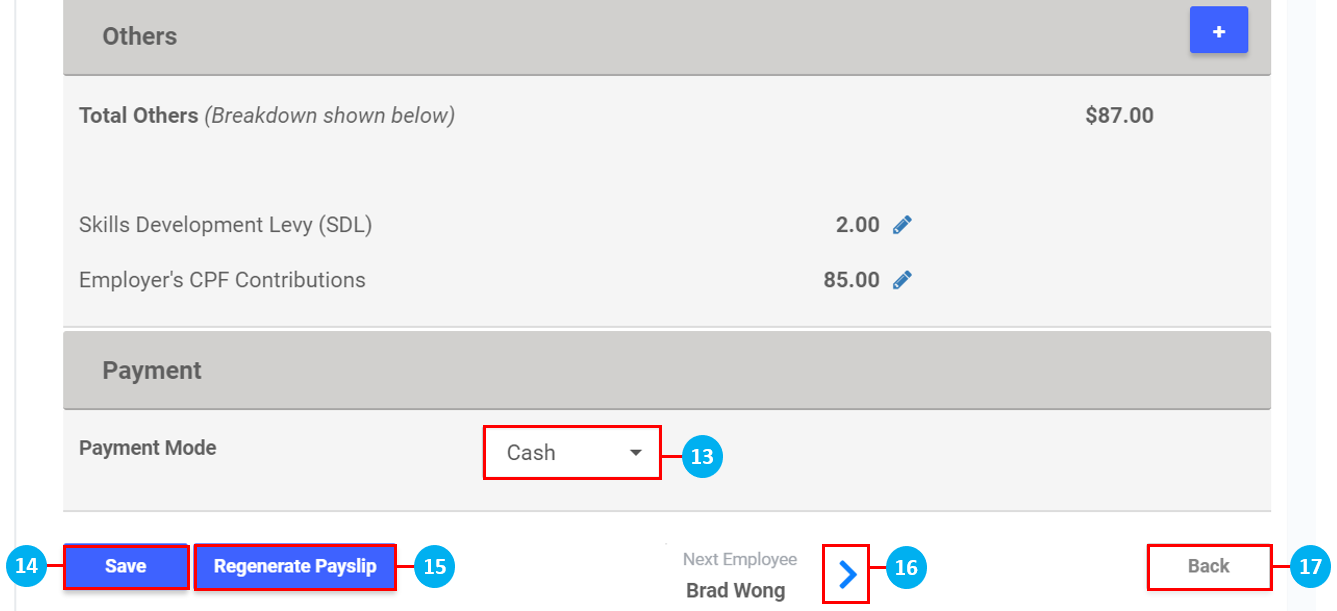
- Select the Payment Mode from the drop down list.
- Once all amendments to the Payslip have been made, click Save.
- Click Regenerate Payslip to return it to the original copy before any amendments were made. (*Note: Do this if any global settings were changed i.e. a Pay Item setting was changed in Settings or a Pay Item was added to the Employee's profile after this Payroll Batch was generated. Clicking on Regenerate Payslip will reflect those changes in this Payslip automatically.)
- Click on the icons to switch between the payslips of Employees.
- Click on Back to return to the Payroll Batch.
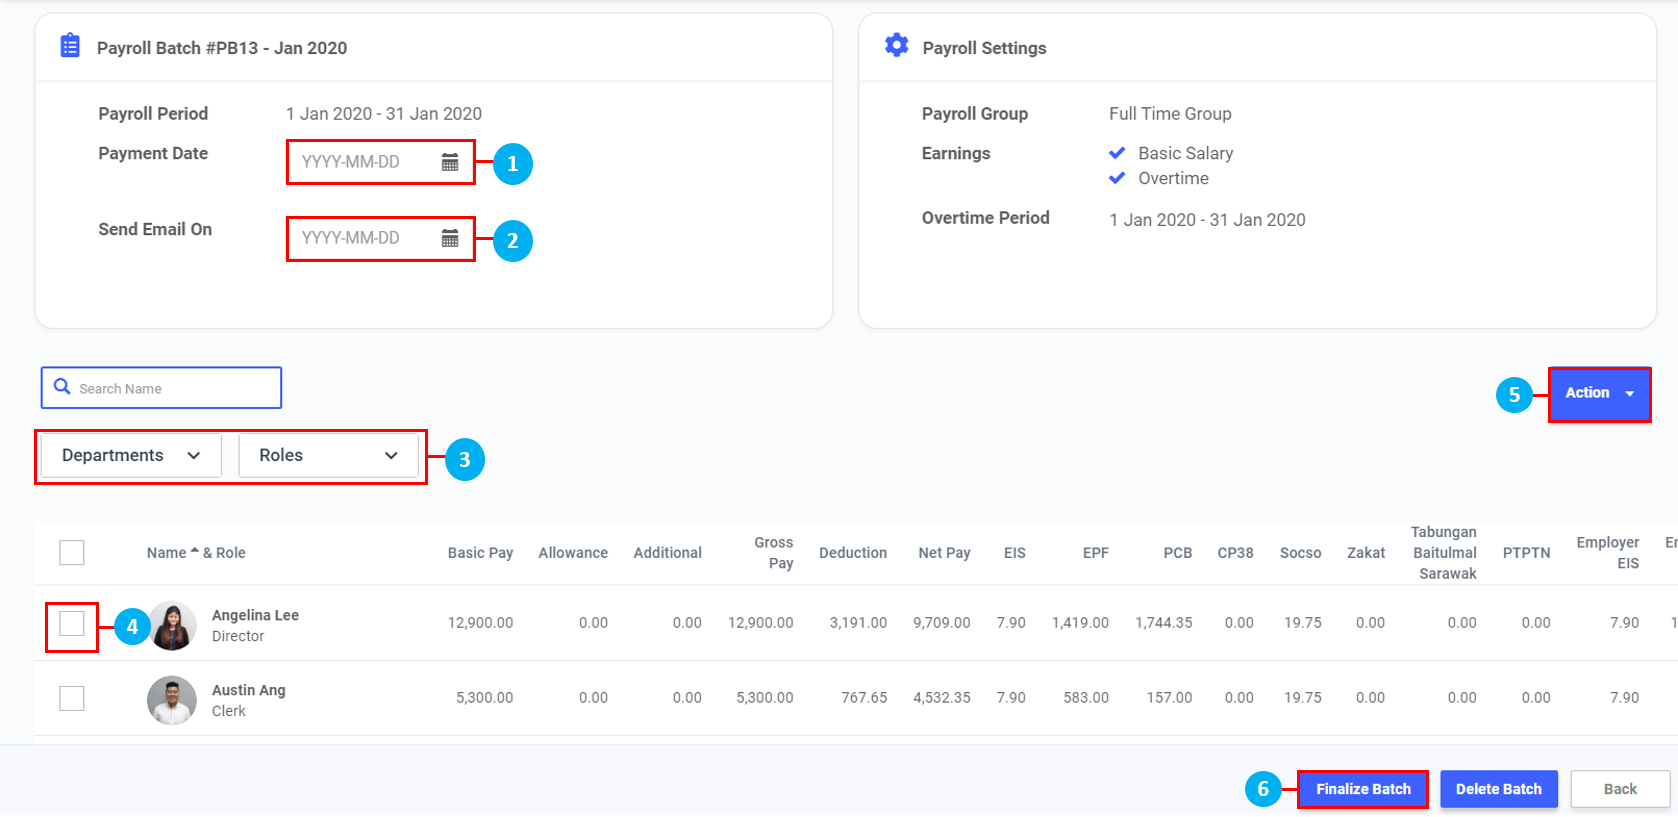
Step 5: Finalizing your Payroll
- Select your Payment Date.
- Select Send Email On Date (date where pay slips are released to employees)
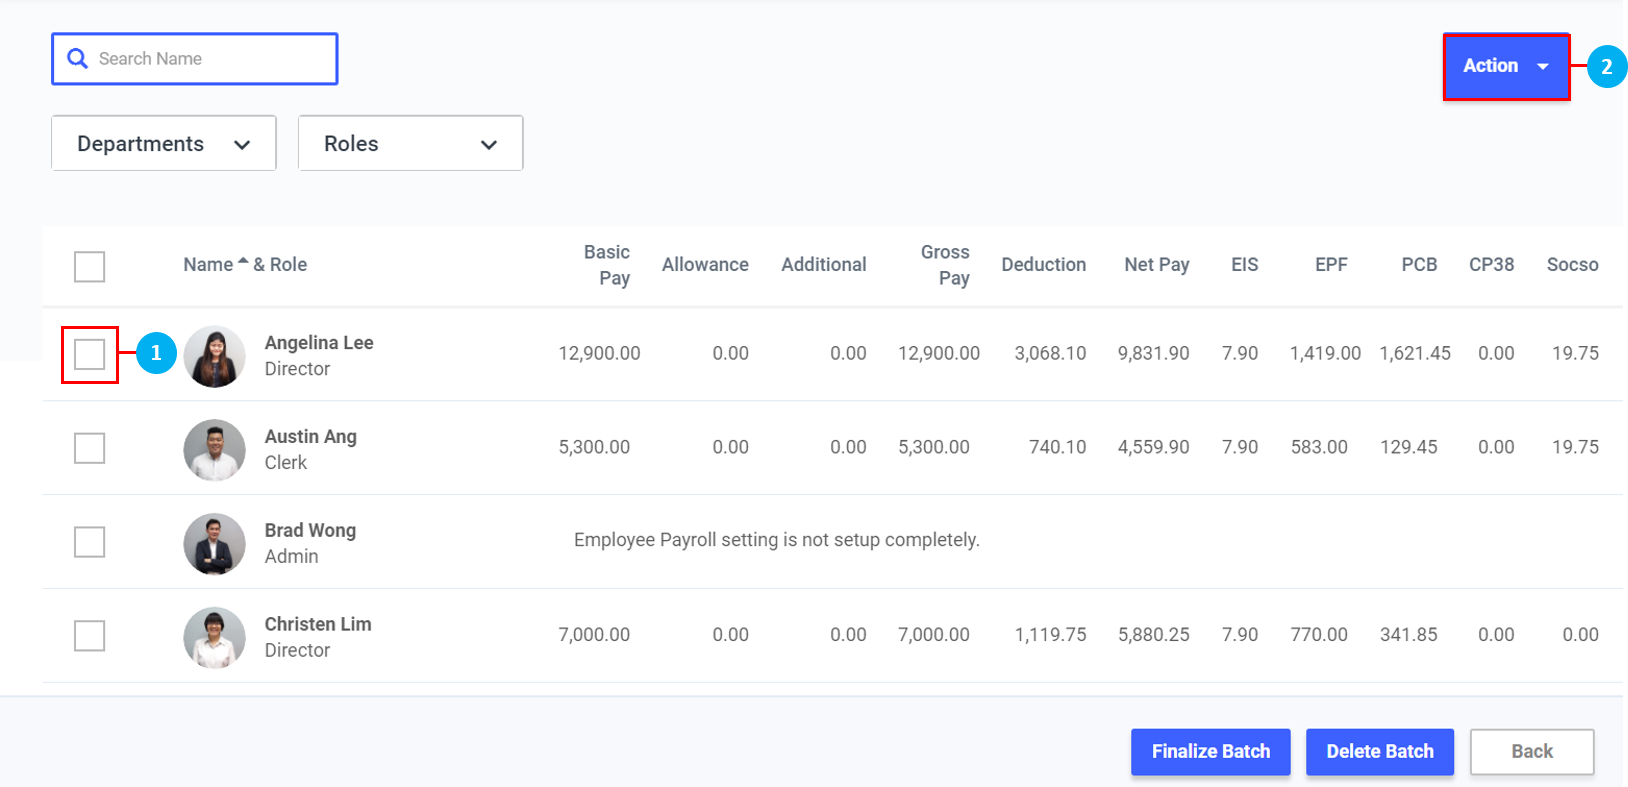
- Select Department & Role to filter employees displayed.
- Check to Select User/ Users, to be affected by Action on "5."
- Click Action to reveal drop down menu for the following:
- Click to Finalize Batch
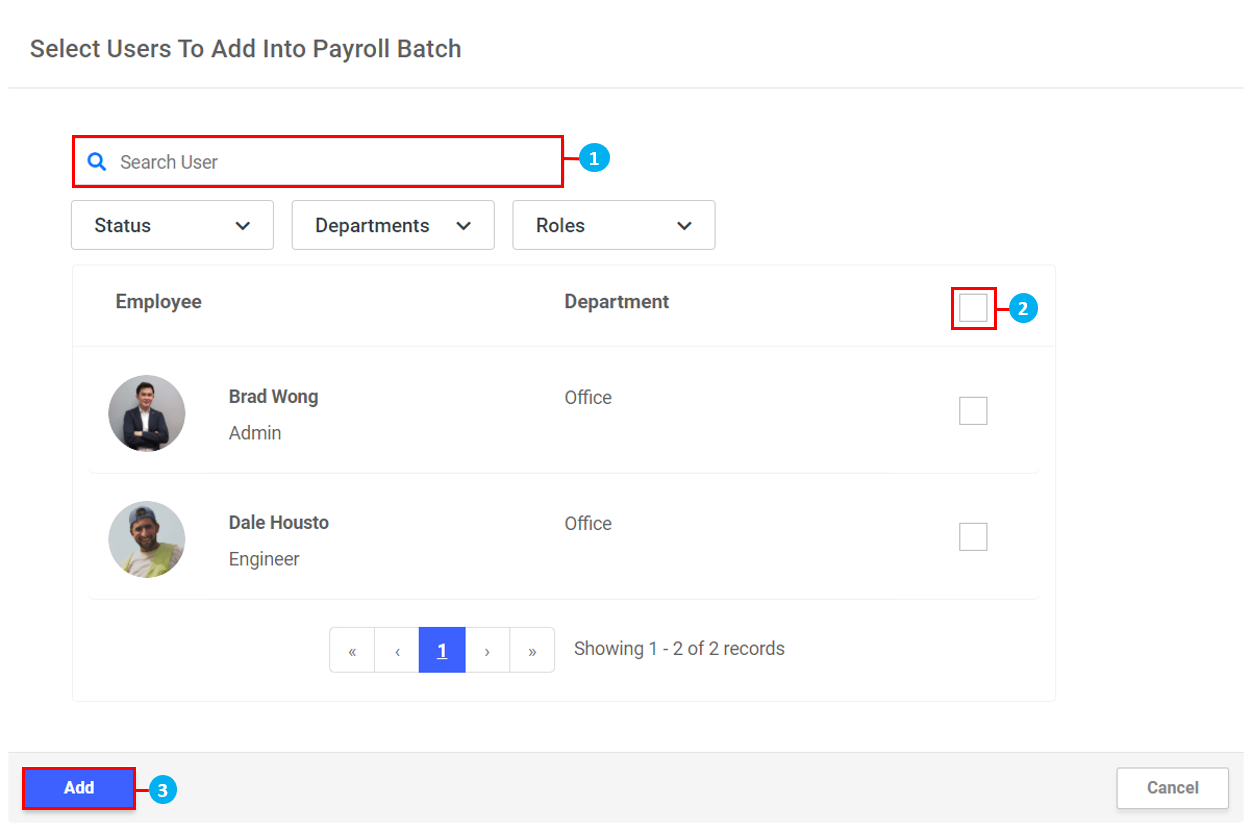
Add Users to an existing Payroll Batch
- Search for Users using the search bar
- heckbox to select individual employees
- Click Add
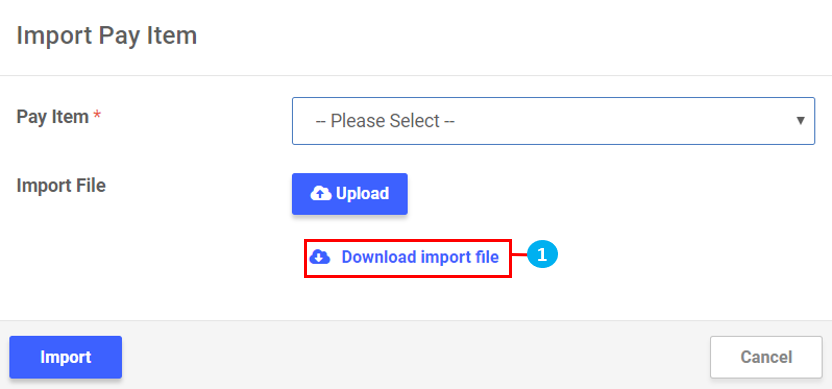
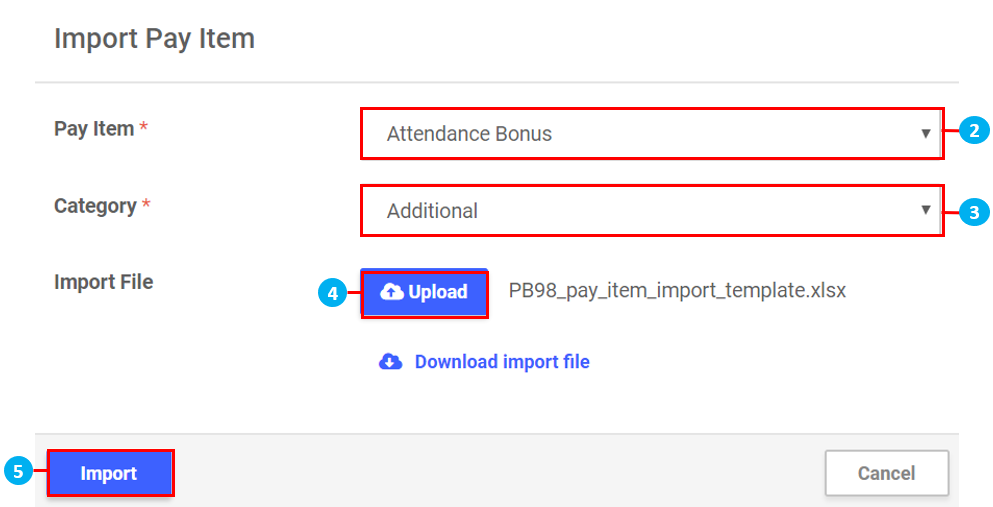
Import Pay Item
- Click on Download import file. The Excel template file will be downloaded. Fill in the template file and save it to your computer
- Select the Pay Item
- Once selected, select the Category from the drop down list that appears. For those Pay Items where there is only one option, the drop down list will be disabled
- Click upload to locate the saved Excel template file in your computer
- Click Import. The values will be updated in the Payroll Batch. (*Note: The values uploaded using the import template will override any existing values in the corresponding Pay Item in the Payroll Batch)
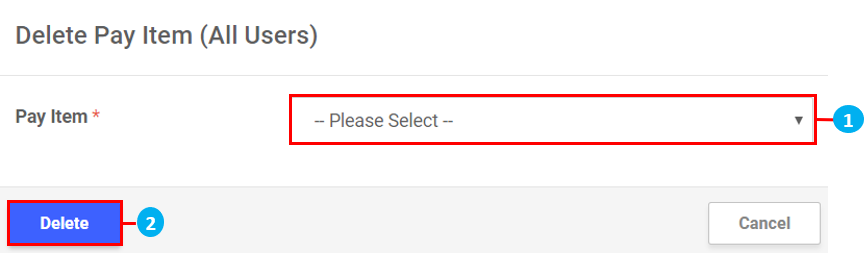
Delete Pay Item (All Users)
- Select the Pay Item you would like to delete from the drop down list
- Click Delete
- Click Proceed to confirm. (*Note: The action will deleted the selected Pay Item from all the users in the Payroll Batch

Regenerate Selected Payslip
- Click the checkbox to select individual employees to regenerate their payslip.
- Click on the
 icon, then click on Regenerate Selected Payslip.
 - Click Confirm.
Remove Selected Users
- Click the checkbox to select individual employees to remove them from the Payroll Batch.
- Click on the icon, then click on Remove Selected Users.
- Click Confirm.